AWS Cloud Operations & Migrations Blog
Share your Amazon CloudWatch Dashboards with anyone using AWS Single Sign-On
Amazon CloudWatch enables customers to collect monitoring and operational data in the form of logs, metrics, alarms, and events, thereby allowing easy workload visualization and notifications. Traditionally, operational health data access was only viewable for technical support staff, thereby making operational health opaque to a wider business audience. However, actionable and valuable business insights can be gained by expanding CloudWatch data access to other people who are not deeply knowledgeable about the technical details of their cloud or on-premises environments.
Meaningful business metrics examples include the rate of purchases made on an e-commerce application, overall web applications response times, or alerts showing impacts to overall datacenter infrastructure. CloudWatch is a multi-purpose timeseries, log, event, and alarm-management system that can be easily utilized to power observability into business KPIS. Now, exposing this data to stakeholders is easier than ever before.
To help manage this information access, Amazon CloudWatch has introduced CloudWatch dashboard sharing. This allows customers to easily and securely share their CloudWatch dashboards with people outside of their organization, in another business unit, or with those with no access AWS console access. This blog will demonstrate how a dashboard can be shared across the enterprise via a SAML provider in order to broker this secure access.
For this example, we will provide an overview of how to integrate Amazon CloudWatch with AWS Single Sign-On (AWS SSO), as well as the components required. This blog will not focus on setting up AWS Single Sign-On, and it requires that you have a working implementation of AWS Single Sign-On or another configured SAML provider. We have guidance for how to set up and operate AWS SSO here.
Solution Overview
The solution will rely on AWS Single Sign-On as the entry point for users to gain access to CloudWatch dashboards. AWS Single Sign-On will act as a SAML provider that will federate with an Amazon Cognito user pool granting users read-only access to CloudWatch dashboards. While we are leveraging AWS SSO today, you can utilize other identity providers of your choosing, and you do not need to include AWS SSO in your environment. AWS SSO controls who has access to the dashboard by assigning groups to the CloudWatch dashboard applications that you publish.
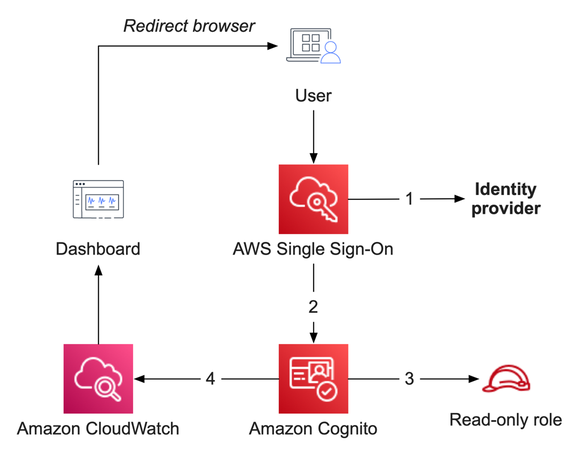
Figure 1: Solution overview, showing the flow between AWS SSO, Amazon Cognito, and Amazon CloudWatch
Prerequisites
This blog assumes that you have fulfilled these prerequisites:
- AWS SSO is already configured to use an identity provider. We will utilize the email address of your users as a SAML attribute – your environment may differ slightly.
- A CloudWatch dashboard that you are prepared to share.
Services utilized in this solution
Amazon CloudWatch collects monitoring and operational data in the form of logs, metrics, and events, and then visualizes it via automated dashboards so that you receive a unified view of your AWS resources, applications, and services that run in AWS and on-premises.
AWS Single Sign-On (AWS SSO) is where you create, or connect, your workforce identities in AWS, as well as manage access centrally across your AWS organization. Choose to manage access just to your AWS accounts or cloud applications.
Amazon Cognito (Cognito) lets you quickly and easily add user sign-up, sign-in, and access control to your web and mobile apps. Amazon Cognito scales to millions of users and supports sign-in with social identity providers, such as Apple, Facebook, Google, and Amazon, as well as enterprise identity providers via SAML 2.0 and OpenID Connect.
Steps to enable dashboard sharing
Before proceeding, consider the following:
- Enabling dashboard sharing will let all dashboards in this account and region be accessible by the SAML provider, and any user granted access to this application will have read-only access to all dashboards in that region.
- CloudWatch is a regional service. So if you wish to share dashboards from multiple regions, you must repeat part of this procedure for each AWS region.
- We are utilizing the default Identity and Access Management role created by CloudWatch. This does not allow default viewing of CloudWatch Logs data or composite alarms. If desired, these can be enabled later.
Implementation steps
- Open the AWS console and navigate to CloudWatch. From here, find Settings on the bottom-left. Click this to view the CloudWatch settings.
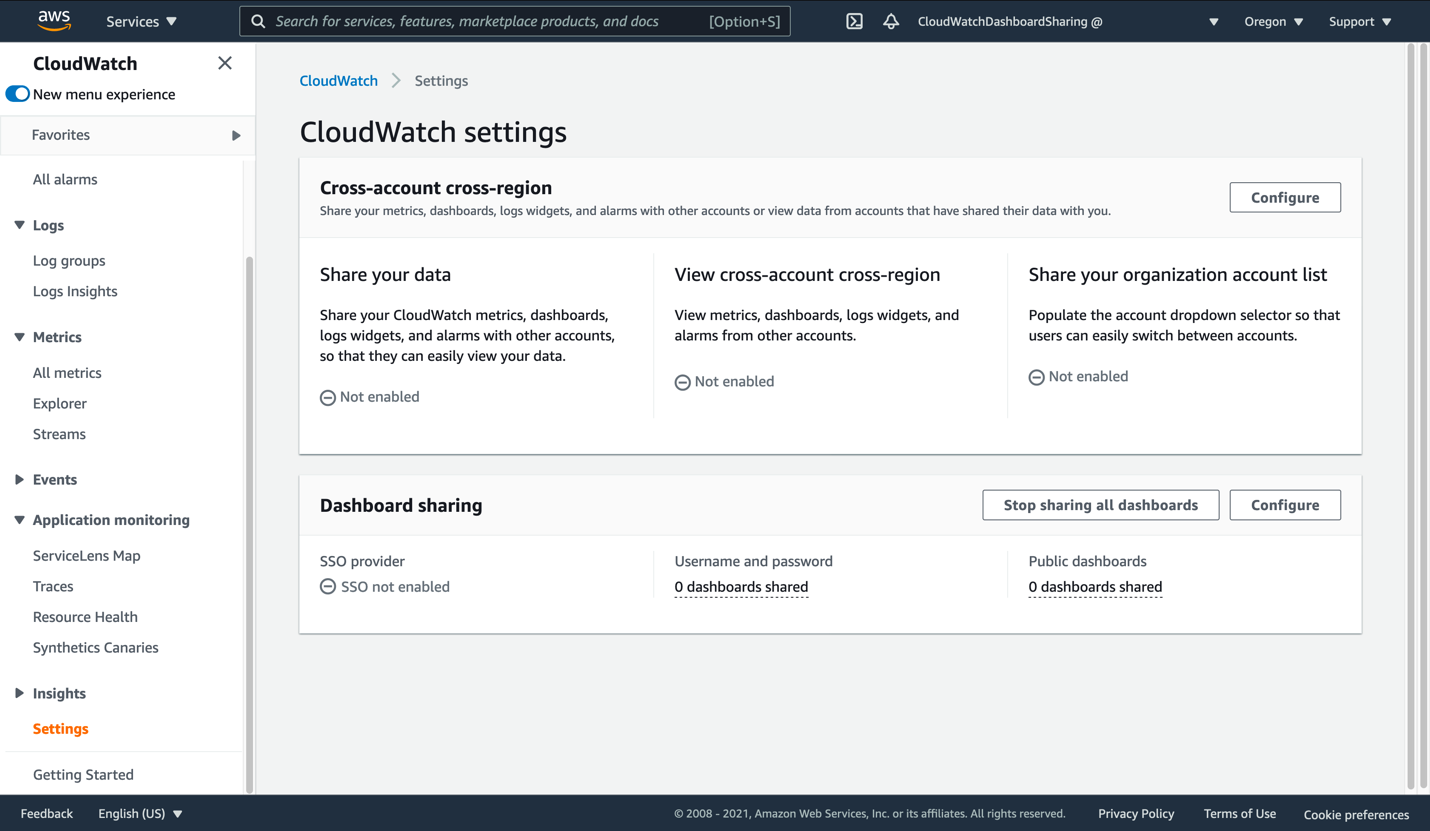
Figure 2: View of the CloudWatch settings page
- Click Configure in the Dashboard sharing section. This will take you to the SSO Provider dialog.

Figure 3: The CloudWatch SSO provider selection page
- Click Manage SSO providers to begin the next step. This opens the Cognito console in a new browser tab. Keep the CloudWatch console tab open, as you will be returning to it soon.
In the Cognito console, you should see a view similar to this:
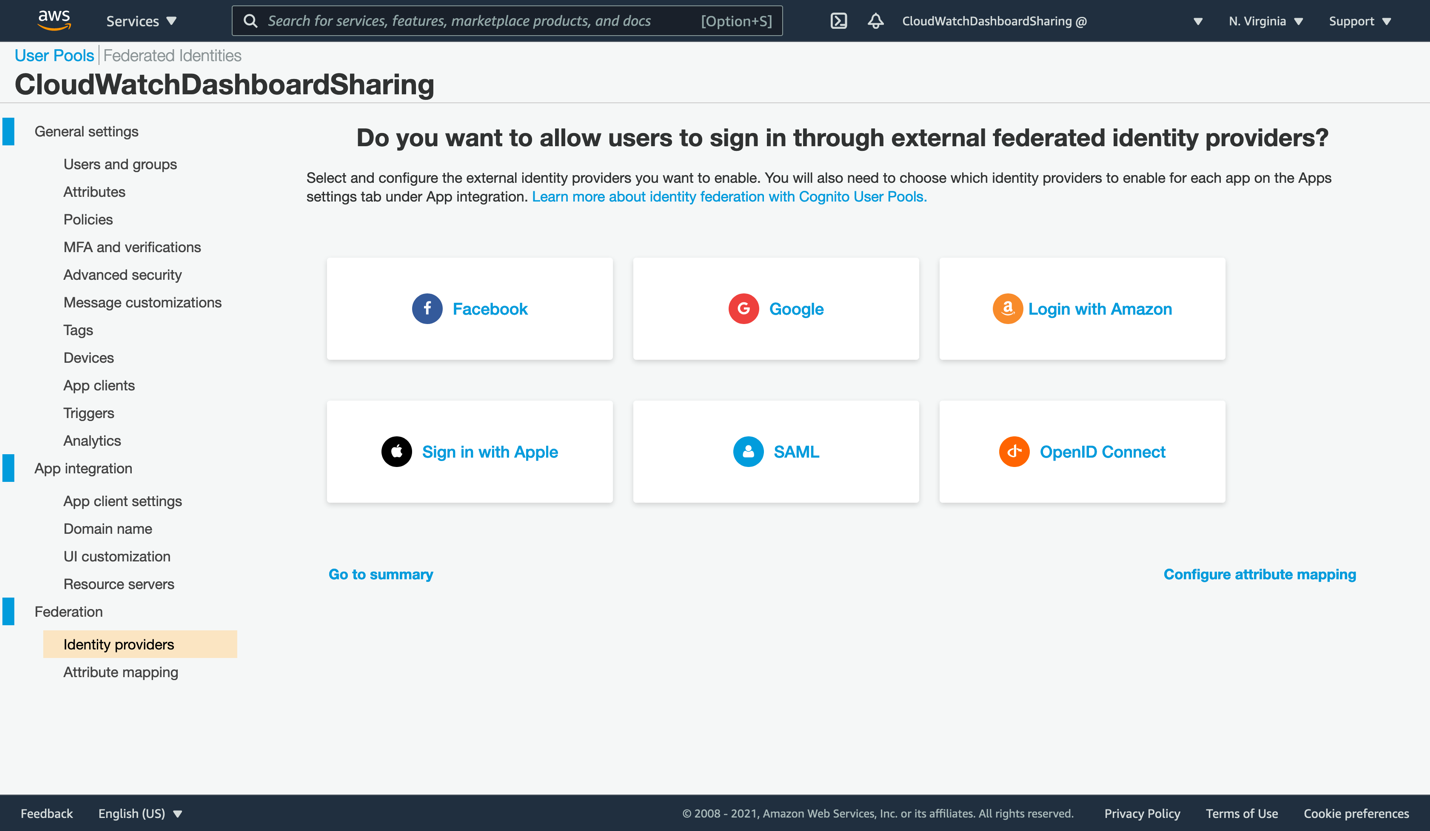
Figure 4: First opening of the Cognito console
- The wizard has already created a Cognito user pool called CloudWatchDashboardSharing and partially configured it for you. Next, create the SAML integration that will allow AWS SSO to broker access for your users. Click the SAML box to open the SAML dialog.
Open the AWS SSO console in a new browser tab so that we can generate the Single Sign-On application that will allow access to a dashboard in your account. From the AWS SSO console, click Applications on the left. Your list of applications may be similar to this, or it may be empty if you are a new AWS SSO user.

Figure 5: List of applications within AWS SSO
- Click Add a new application to proceed. There is no CloudWatch pre-configured application in AWS SSO, so we will be creating a custom SAML 2.0 application instead. Click Add a custom SAML 2.0 application.
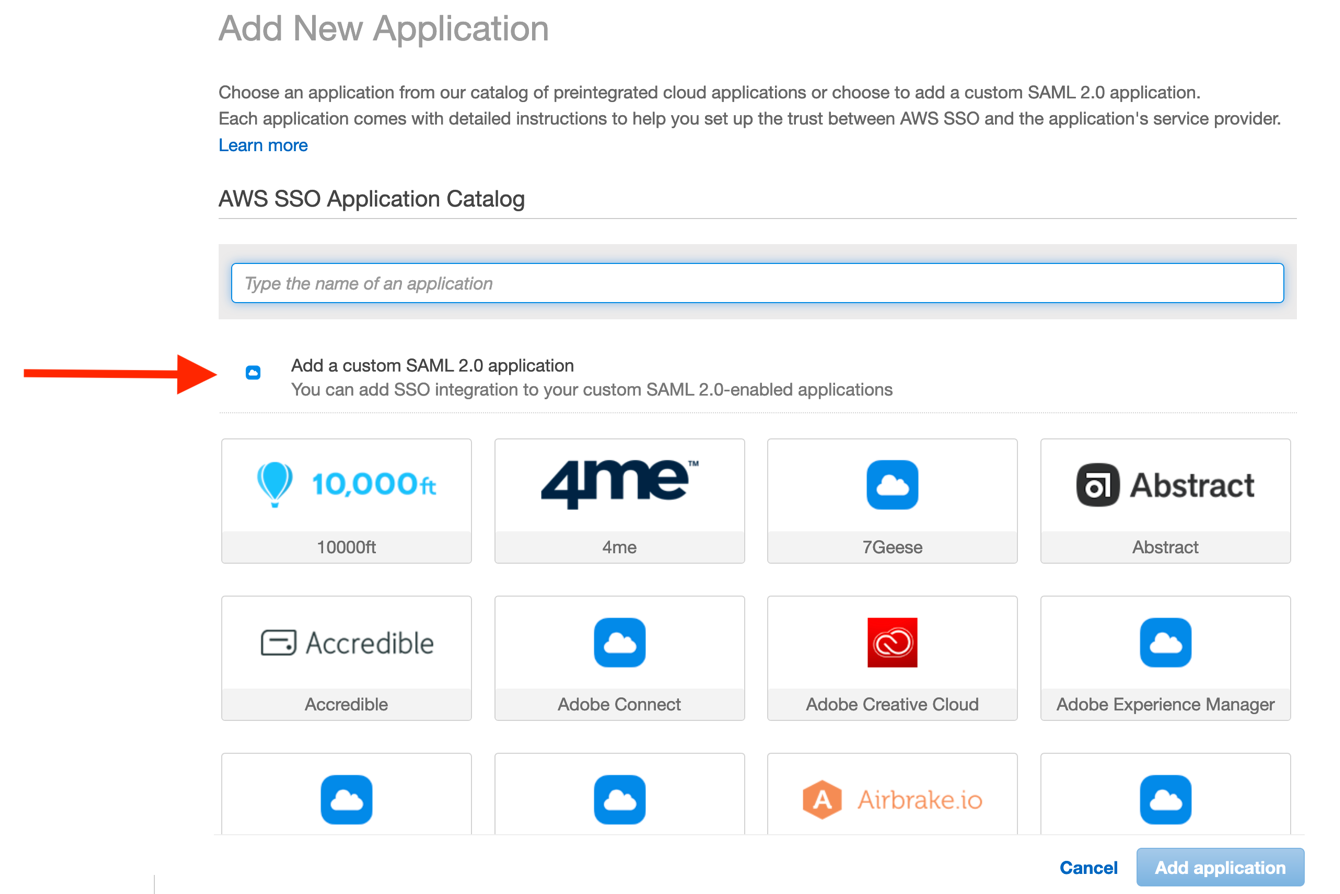
Figure 6: Beginning the custom SAML 2.0 application configuration
The configuration dialog requires that we copy some data from the CloudWatch and Cognito consoles. Likewise, you must copy some data back into the Cognito console, thereby creating the trust between both applications.
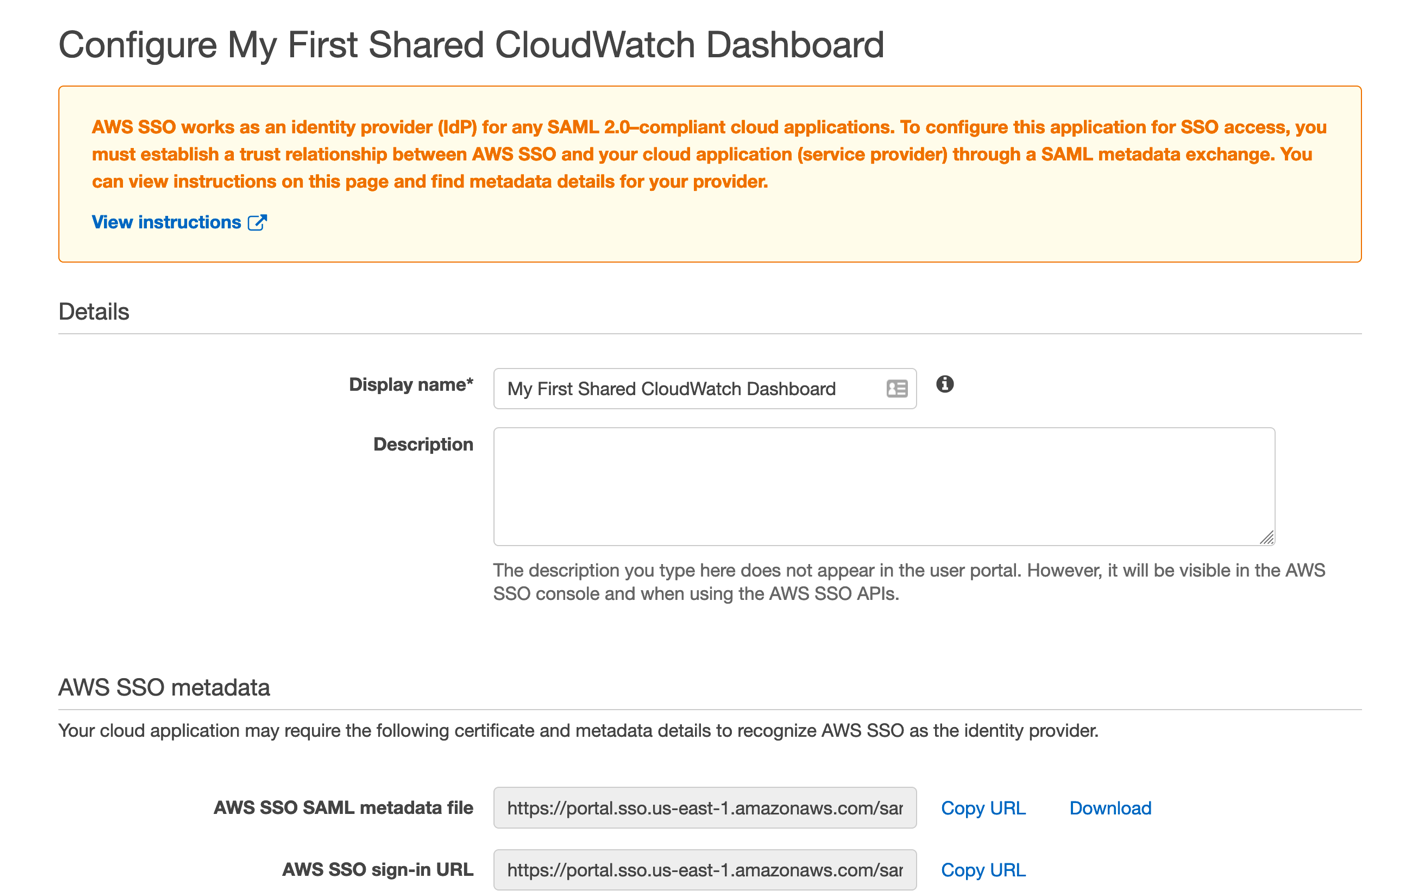
Figure 7: Enter the name of your new dashboard sharing application
- Give your new SSO application a name and description corresponding to the first dashboard you wish to share.
- Next, click Copy URL on the AWS SSO SAML metadata file line, and then paste this URL into the Cognito console’s Metadata document field. Complete the Provider name field as well, and then click Create provider in the Cognito console. Your new provider will now appear under the new Active SAML Providers section.
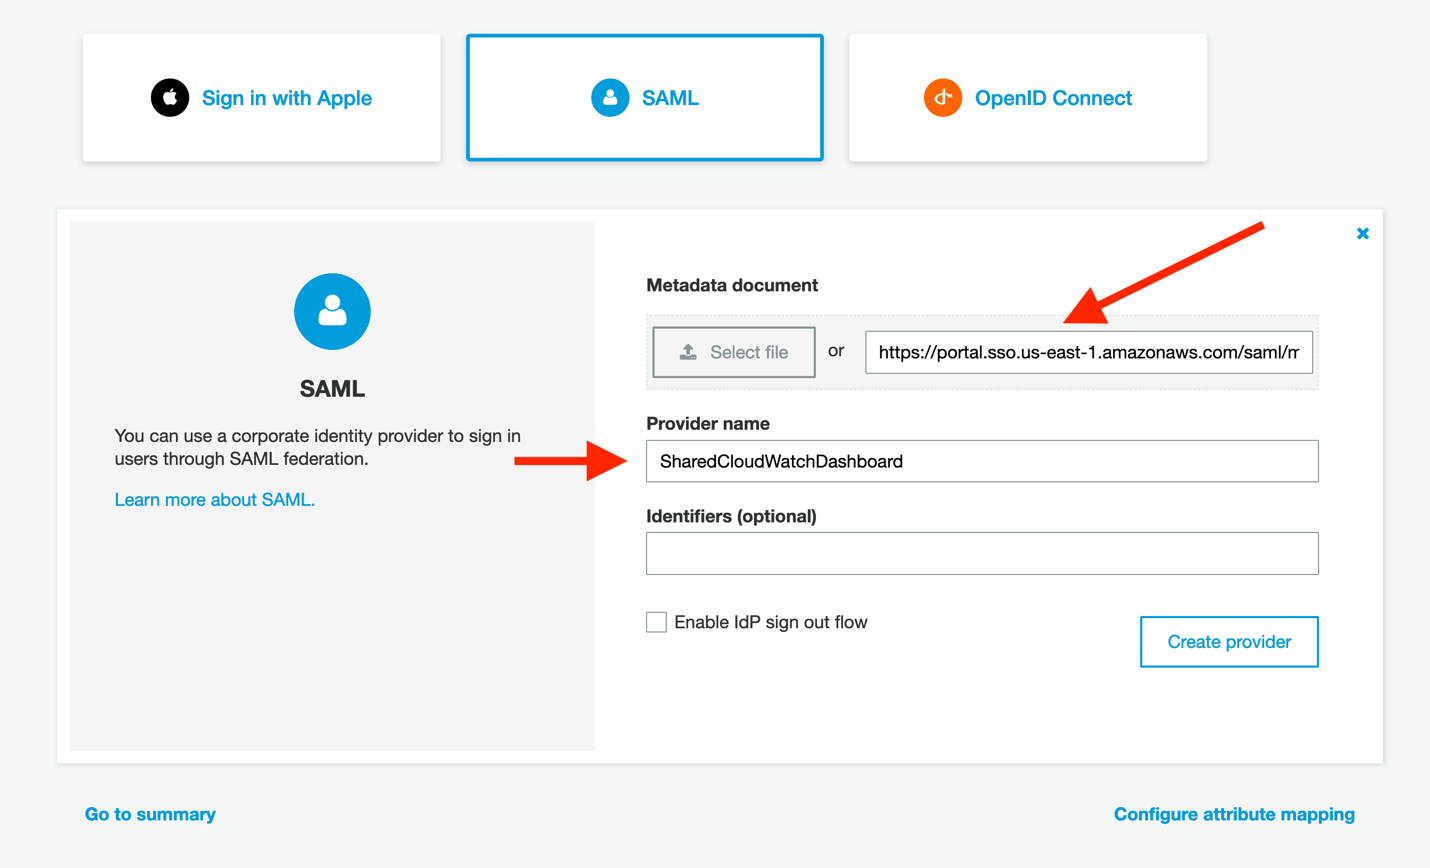
Figure 8: Configure Cognito to read the AWS SSO metadata document
- In the Cognito console, click on Attribute mapping on the left side of the screen. We must add a value here so that we can map the user identities consistently from your identity provider into Cognito. Click Add SAML attribute, ensure that Capture is checked, and then enter email for both the SAML attribute and the User pool attribute. Then, click Save changes.
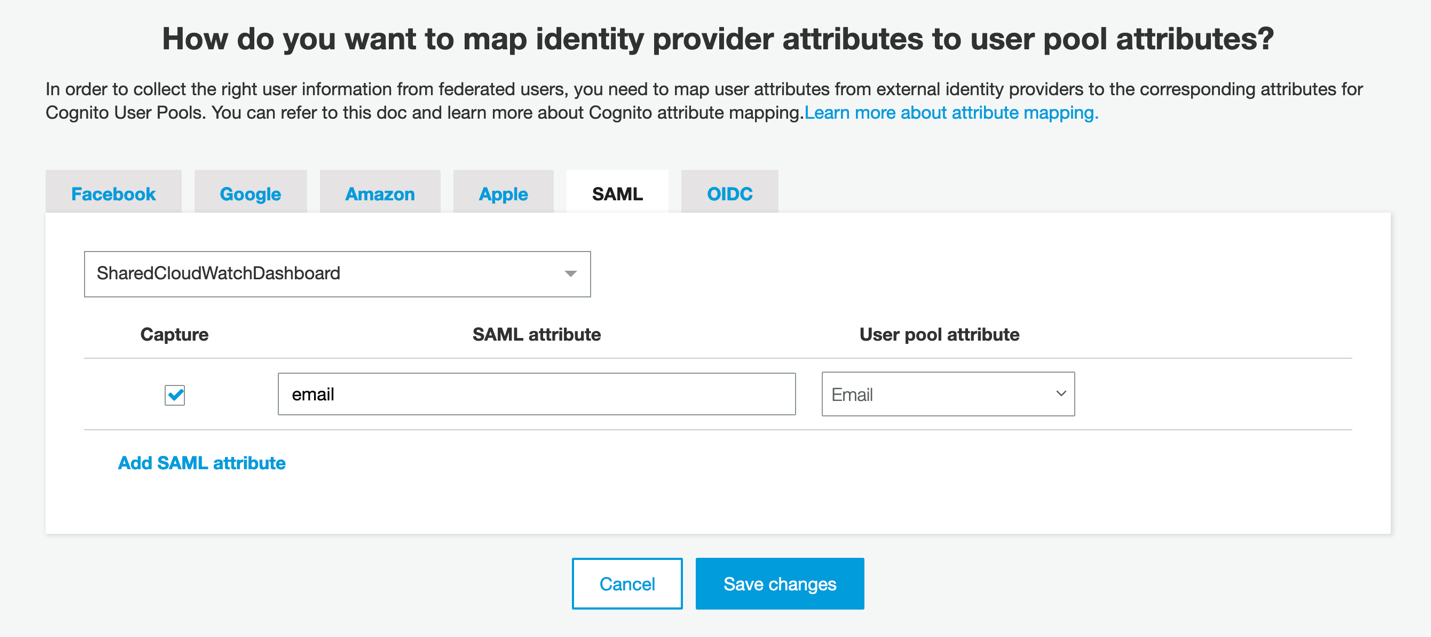
Figure 9: User identities using their email attribute
- Click App clients to continue the Cognito configuration, and then click Add an app client.
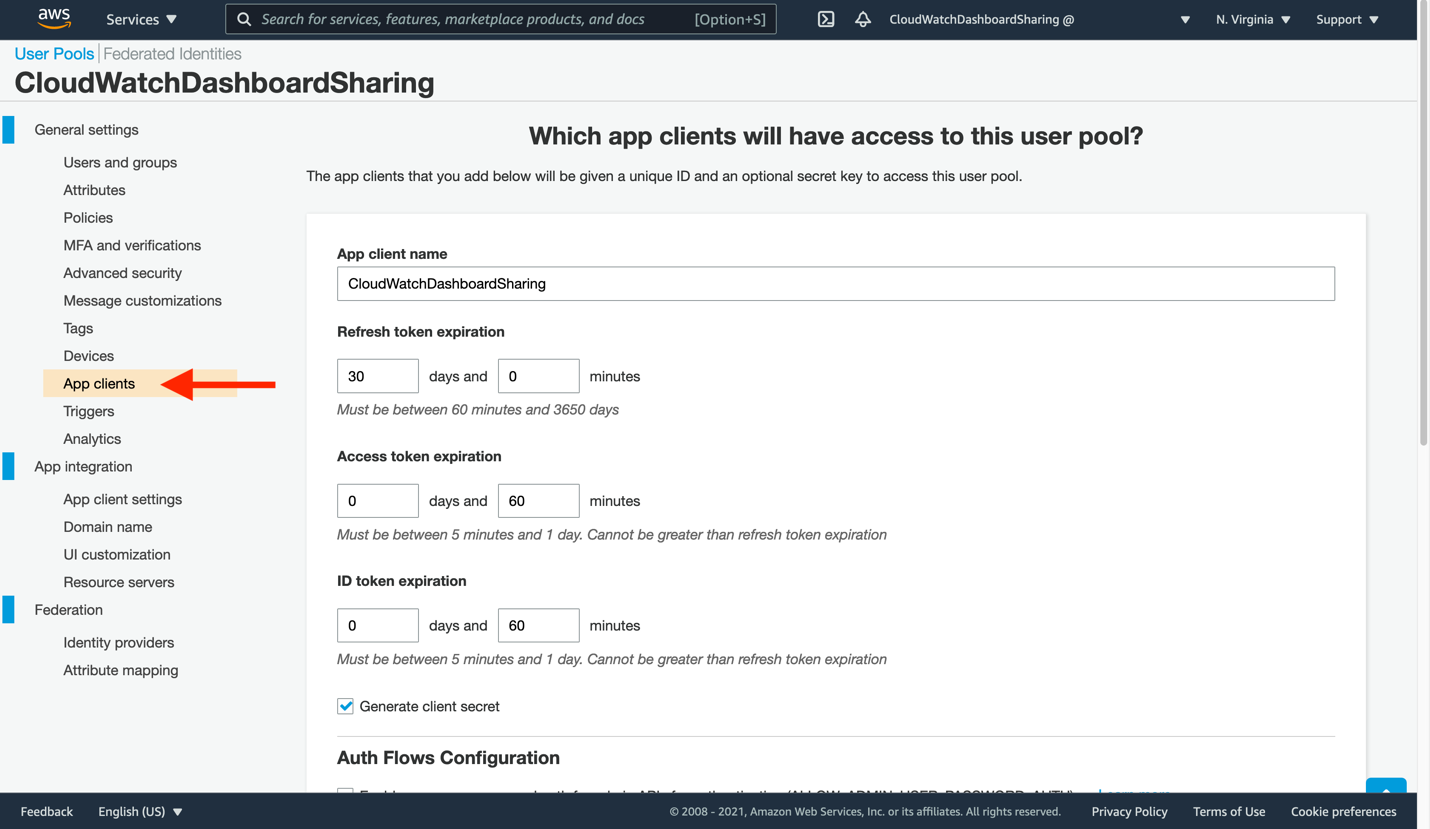
Figure 10: Create a new app client to consume your CloudWatch dashboard
- Enter a new App client name, and then leave the remaining settings unchanged. Click Create app client at the bottom to proceed.
- Now, you will tell our app client where to find the CloudWatch dashboard sign-in and sign-out URLs. Click App client settings on the left-side navigation. The app client you just created will be present here, though not yet ready for use. Make the following changes:
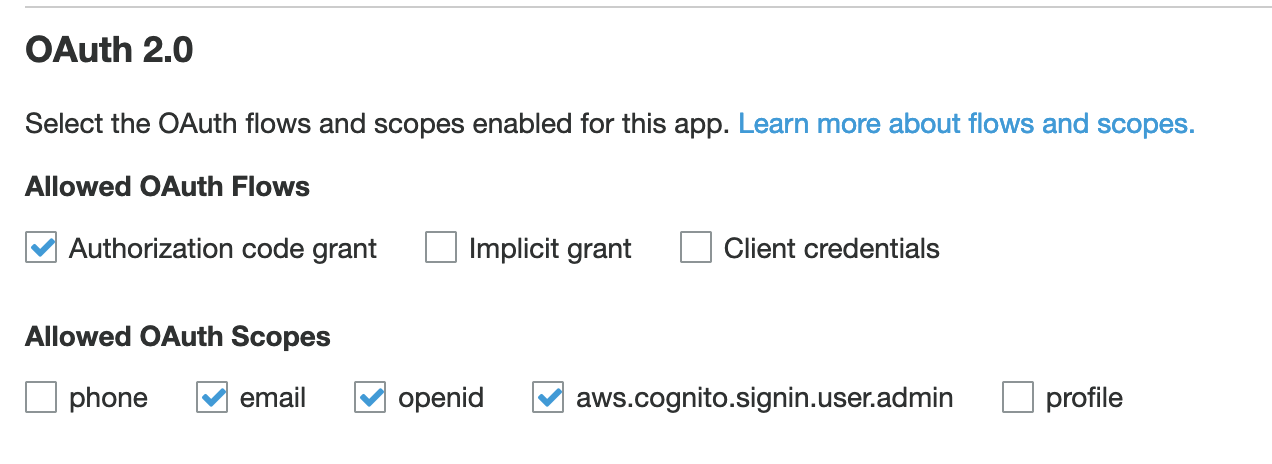
Figure 11: Configure your app client settings
- Check the box to enable your identity provider
- Enter https://cloudwatch.amazonaws.com/dashboard.html for both the Callback URL and Sign out URL. These indicate where your users will be redirected after a successful log in or log out.
- Select the following OAuth flows: Authorization code grant
- Select the following Allowed OAuth Scopes: email, openid, aws.cognito.signin.user.admin
- Click Save changes.
- You are nearly done! Return to the CloudWatch console, specifically to the Dashboard sharing page. Click the refresh icon in the Available SSO providers section, and then select your SSO application, followed by Save changes. This will provision the remainder of the Cognito user pool, and let us finalize the AWS SSO application.
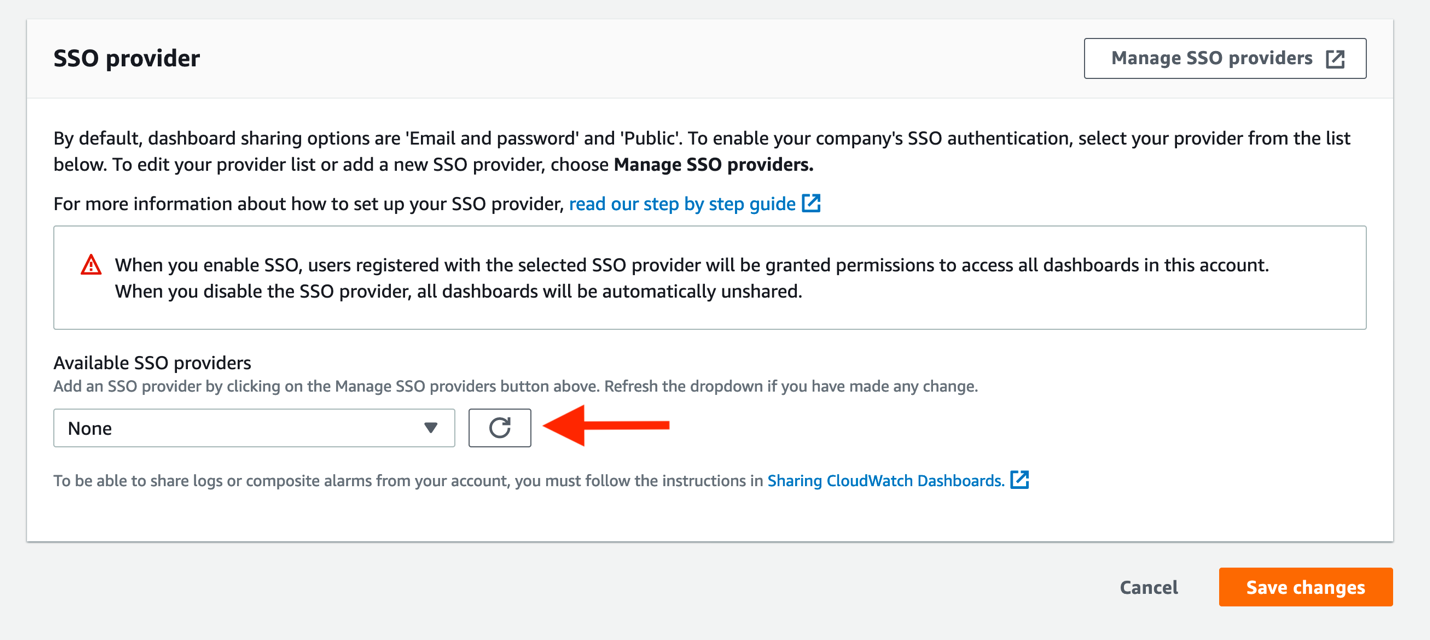
Figure 12: Attach your SSO provider to CloudWatch
- You must supply two pieces of information from Cognito back into the AWS SSO console, where our SAML application is not yet fully configured. First, click App integration in the Cognito console. You should now see a Domain value (which was not present before). Copy this to your clipboard.
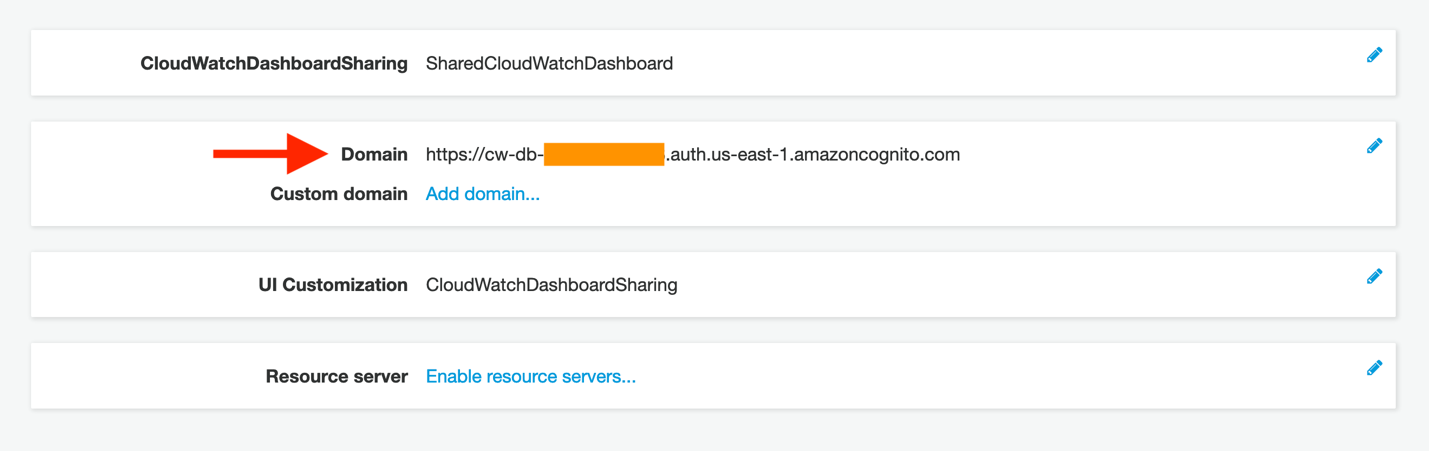
Figure 13: Copy the newly created domain name
- Return to the AWS SSO tab in your browser. Click the If you don’t have a metadata file, you can manually type your metadata values link. This will display the Application metadata section, seen here:
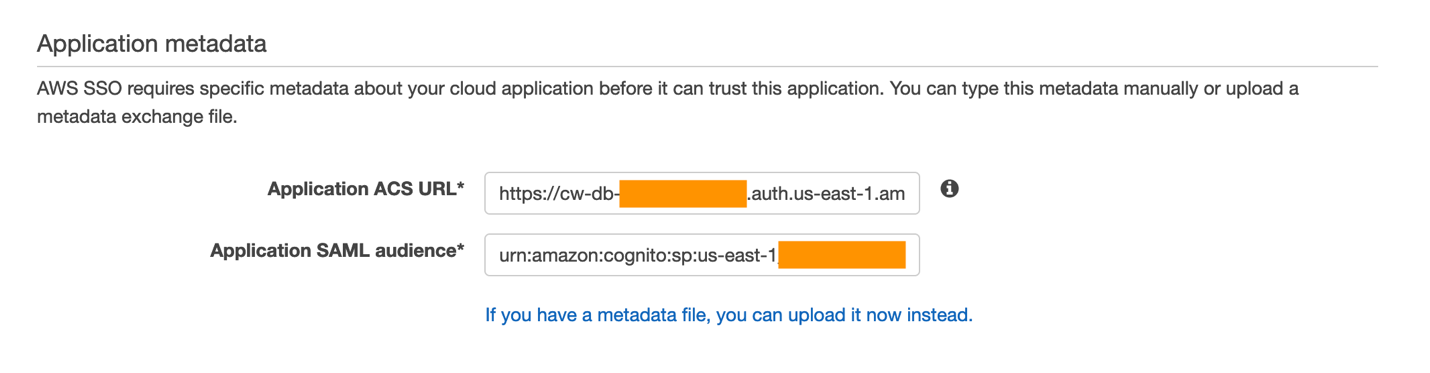
Figure 14: View of the Application metadata configuration portion of your AWS SSO application
- Paste this domain value into the Application ACS URL field in the AWS SSO console, but append the following to the end:
/saml2/idpresponse
A completed application start URL will look similar to this if you are submitting a POST binding in your SAML provider (such as in our example):
https://cw-db-XXX.auth.AWS-REGION-CODE.amazoncognito.com/saml2/idpresponse
- Next, enter the Application SAML audience. This will also need to be edited. In the Cognito console, click General settings on the left-side navigation.

Figure 15: A sample view of the Cognito pool ID, as seen from the console
- Now copy this value into the AWS SSO page’s Application SAML audience field, with the following prefix:
urn:amazon:cognito:sp:
Your completed value will look similar to this:
urn:amazon:cognito:sp:AWS-REGION-CODE_xXXXXXXXX
- From the CloudWatch console, navigate to the dashboard that you wish to share. Each dashboard can now be published as a unique application with the same Application ACS URL and Application SAML audience. Only the actual dashboard start URL must be changed. Navigate to your target dashboard, click Actions, and then Share dashboard.
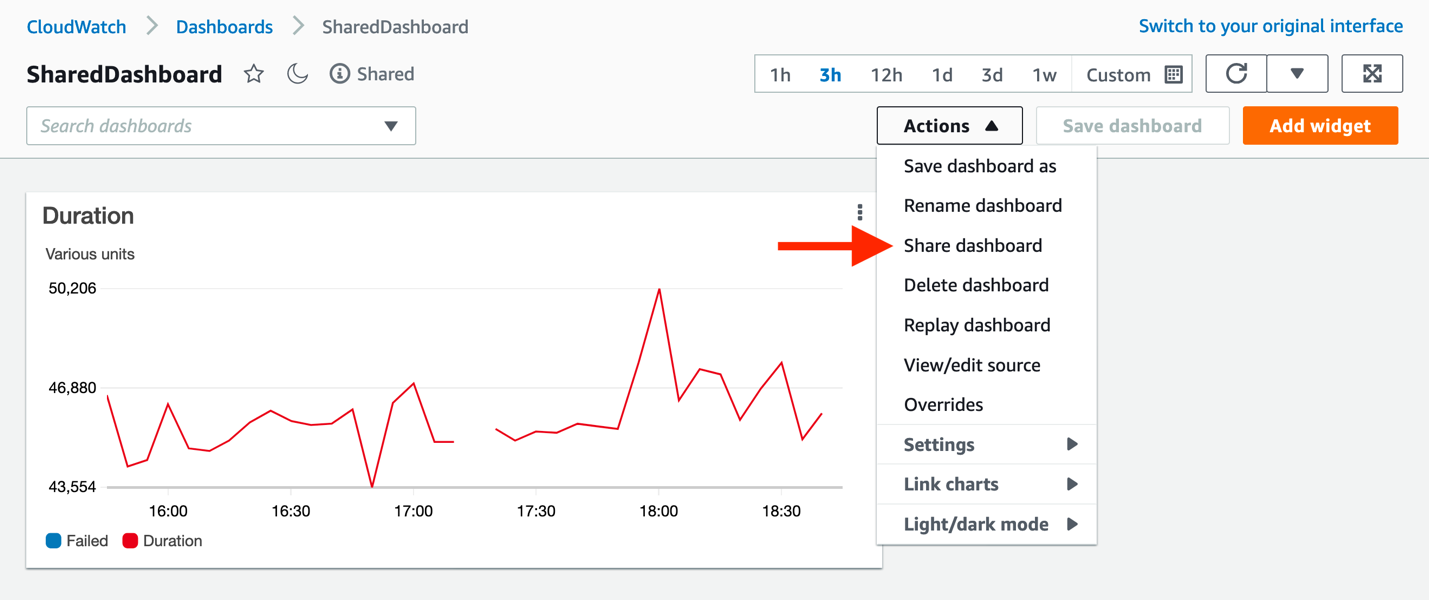
Figure 16: Finding the unique URL for the dashboard to be shared
- From this page, copy the Sharable linkand paste it into the Application start URL in the AWS SSO console, and then click Save changes in AWS SSO.
Click Attribute mappings, and enter the following:
Maps to this string value or user attribute in AWS SSO: ${user:email}
Format: emailAddress
Note: the SAML provider provides an email value in the assertions it creates when redirecting your users to the CloudWatch dashboard.
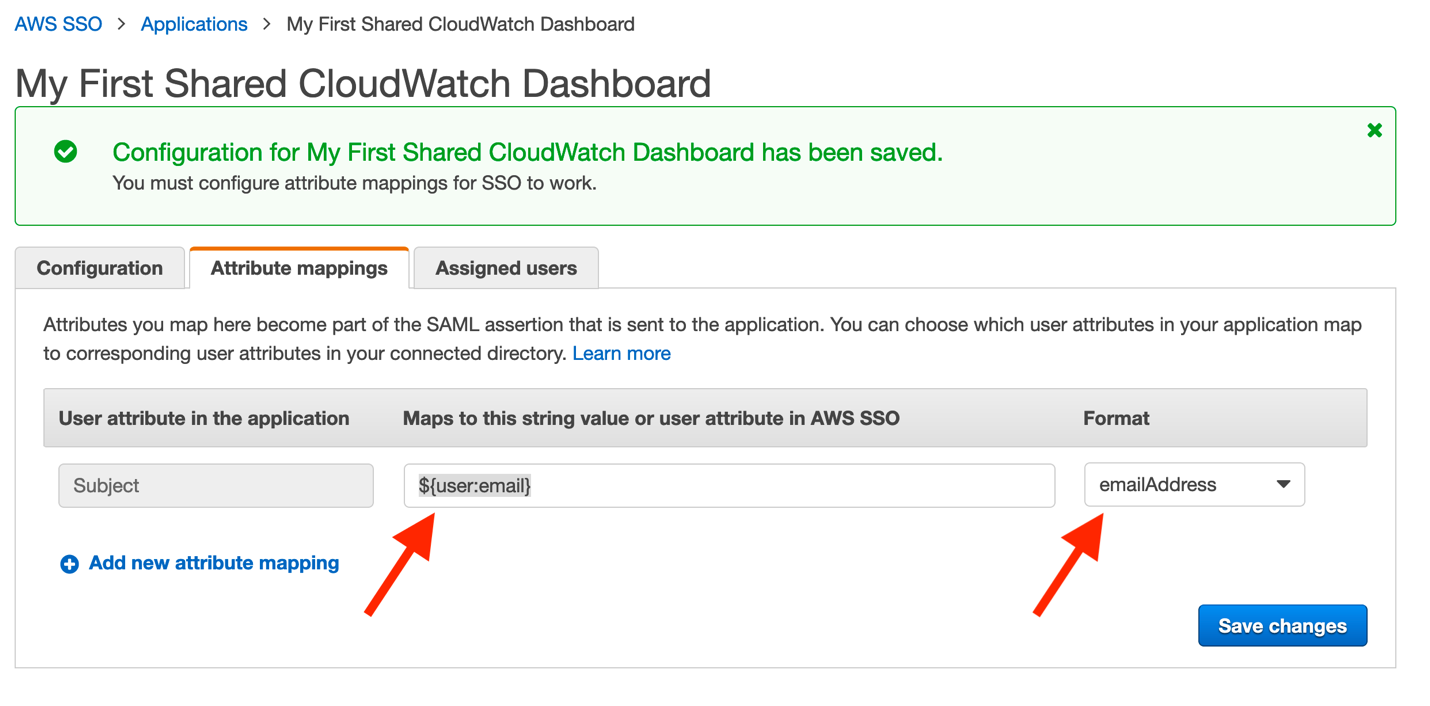
Figure 17: Mapping user’s email addresses within AWS SSO
- Finally, click Save changes. Configuration is now complete!
You must assign users to your new application. However, once completed, they will have access to your dashboard through the standard AWS SSO login page, similar to that seen here:
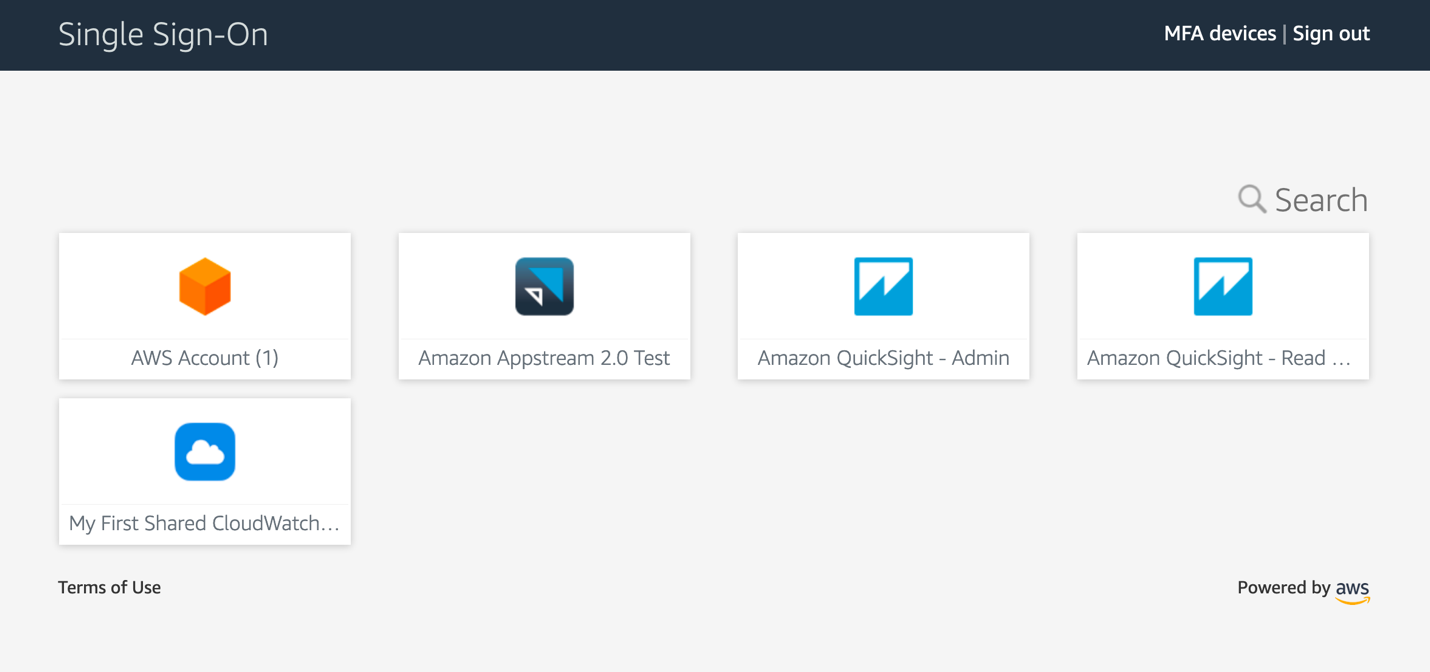
Figure 18: Standard view of the AWS SSO application page
Summary
Your users now have a non-console experience allowing them to view dashboards that you publish to them. Even a business audience can take full advantage of the data that CloudWatch contains. Their utilization of the platform does not require any AWS account access, roles, or special permissions, and it will enable users of corporate identity providers to consume operational metrics, logs, and alarms in a convenient and secure fashion.
Figure 19: Animated GIF of the login experience for a CloudWatch dashboard