AWS Developer Tools Blog
Deploying AWS Step Functions using GitHub Actions
In order to achieve repeatable, secure, and automated deployments, it is necessary to set up a CI/CD pipeline. Typically, the CI/CD pipeline will lint configurations, build, test, and deploy your code and infrastructure using one seamless process. A common best practice for deploying your infrastructure and code to AWS is to tie into a source code management (SCM) system’s capabilities such as those that GitHub provides. In this blog post we will show you how to utilize GitHub Actions and AWS Serverless Application Model (AWS SAM) to create a continuous deployment process using an AWS State Machine. During this process, you will incorporate the use of other continuous integration items such as linting and unit tests and set up a process for continuous deployment of an AWS SAM template. We’ve added the sample code that we use to this GitHub repository.
Technologies and tools used
GitHub Actions is a tool to automate your software development life cycle (SDLC) and define your CI/CD as code. Using GitHub Actions, you can do things like automated linting, testing, application builds, and many other continuous integration related items. You can also set up continuous delivery by leveraging other tools such as the AWS Serverless Application Model (AWS SAM) and/or AWS CloudFormation.
AWS Serverless Application Model (SAM), is an open-source framework used for building serverless applications. AWS SAM makes your life easier by simplifying the means of deploying serverless-related resources using its shorthand syntax, and also provides additional functionality via AWS SAM CLI. With the SAM CLI, you can locally simulate an AWS Lambda-like environment in which you can validate, build, test, and deploy your applications you defined using your SAM template and application code.
Within the AWS SAM template of this example you will find an AWS Step Functions State Machine. AWS Step Functions is a serverless workflow service that allows an end-user to stitch together AWS services such as (but not limited to) AWS Lambda, Amazon SageMaker, and AWS Glue jobs. Step Functions are created using the Amazon States Language (ASL) syntax for defining steps in what is known as a state machine.
Combining all of these tools together, we will be walking through an example workflow in which we will deploy resources onto AWS.
Workflow architecture

The diagram above illustrates the workflow architecture for how this example is designed. As depicted above, our GitHub Actions pipeline is configured using two different workflows. These workflows are very similar, but with the main difference between the two being when the sam deploy command gets triggered. For this example, we have configured deployment to only occur when changes land into our main branch. This allows us to have an automated continuous integration process where we can run commands like sam validate, sam build, and unit tests against our application code. When the developer opens a pull request from their feature branch with a target of the main branch, the Secondary Workflow is triggered. All of the steps in this workflow are required to be passing in order to be able to merge code into the main branch. After the Secondary Workflow is successfully completed, a code reviewer is recommended to be used to review and approve any changes before they are merged into the main branch. Once the code has been approved, the developer should then squash and merge the pull request into the main branch. Once completed, this will then kick off the Primary Workflow where the sam deploy occurs, deploying resources to AWS.
Deployment architecture
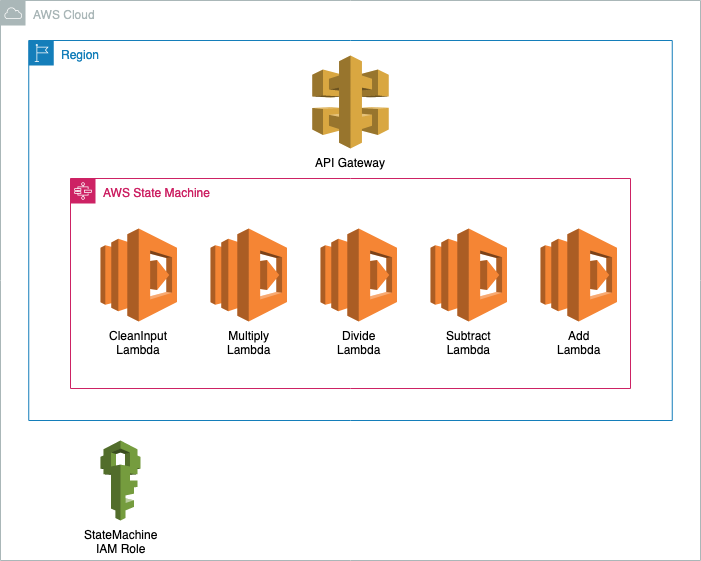
Now that you have a better understanding of the workflow we are using in this example, let’s cover the items within our AWS SAM template that we are looking to deploy to AWS. As seen in the architecture diagram above, this example is deploying an Amazon API Gateway, AWS State Machine, 5 AWS Lambda Functions, and an IAM Role with a custom IAM Policy attached.
Deployment to AWS
After the Primary Workflow is completed successfully, the end result is the deployment of an AWS CloudFormation stack. Successful deployment of this AWS CloudFormation stack means that the resources that were defined in the AWS SAM template are now created and available for use. With these new resources now created on AWS, the AWS Toolkit extension for Visual Studio Code can be used to have visibility of the resources you have deployed into your AWS account.

In addition to being able to visualize your resources at a high level, you can also manage, deploy, and visualize AWS Step Function State Machines in the AWS Toolkit for VS Code. For example, see below a screenshot of the State Machine graph visualization in VS Code.
Resource clean up
To clean up the resources you used to spun up with this tutorial, use the following steps:
- Authenticate into the AWS account to which you deployed resources.
- Find the AWS CloudFormation stack that was created by the pipeline, delete the stack.
- Find the Amazon S3 bucket that was created, which will have the same name as the AWS CloudFormation stack you just deleted. Empty the bucket, then delete it.
Conclusion
In this post, you’ve set up an AWS Step Function State Machine and deployed it to your AWS account using a SAM template and GitHub Actions. You’ve learned how to create a CI/CD pipeline that lints, builds, tests, and deploys a Step Function State Machine to AWS. You’ve also learned how to utilize the AWS Toolkit plugin for VSCode to visualize, manage, and debug your state machine (all without leaving your IDE). If you run in to issues or have questions when trying out this example, share them on GitHub.