Containers
Creating container images with Cloud Native Buildpacks using AWS CodeBuild and AWS CodePipeline
Organizations using Amazon Elastic Container Service (Amazon ECS), Amazon Elastic Kubernetes Service (Amazon EKS), or other container orchestrators all face the same hurdle to getting up and running quickly: how do teams effectively package their application source code in a container image with speed and efficiency? This journey from “source to image” can challenge organizations at many points during their adoption of container technology, whether just getting started or attempting to scale up to hundreds of workloads.
Regardless of the container orchestration engine being used today, the prevailing mechanism used to create container images remains the Dockerfile: a simple text file that specifies a base image along with a series of instructions to execute on top of it. This format has been incredibly popular, likely due to its initial learning curve and the transparency of the format.
The standardization of the format of container images around the Open Container Initiative (OCI) image specification is starting to open the door to new mechanisms for building container images that forego the need for a Dockerfile. Container orchestrators are coalescing around support for the OCI image specification, providing a portable packaging format that can be targeted by alternative tooling and still be consumed by the likes of Docker, Kubernetes, and Amazon ECS.
One of these alternatives to the Dockerfile is Cloud Native Buildpacks (CNB), an incubating project in the Cloud Native Computing Foundation (CNCF) that provides a mechanism to transform your application source code into an OCI-compliant container image without using a Dockerfile. The concept of a buildpack has historically been associated with platform as a service (PaaS) offerings such as Heroku and Cloud Foundry. This latest iteration of buildpacks can be thought of as decoupling the build mechanism of these platforms so that it can be consumed by the broader container community. As this project has matured, it has been adopted by a number of vendors and tools.
A primary benefit of the CNB project is it removes the need to author a Dockerfile to build a container image, which allows application development teams to get their code running in container platforms quicker. This provides an aspect of a PaaS offering like Heroku and Cloud Foundry while deploying to flexible container-based services. The technology is language-agnostic, and there are open source builders that support a range of platforms like Java, .NET Core, Ruby, Node.js, Go, and Python.
Leveraging the CNB project also provides organizations with a standard process to build container images that can be quickly adopted. The alternative to this is for an organization to determine its own processes for creating images, which for more decentralized organizations can result in fragmented container image processes across different teams, as well as additional overhead in solving and maintaining similar solutions.
The CNB project promises a number of additional benefits, including:
- Combining multiple buildpacks in a modular and extensible pattern, promoting reuse
- An alternative mechanism for creating container image layers which results in fewer layer changes and more efficient bandwidth usage
- At-scale updates of the base images of large numbers of container images via rebasing
- Minimizing packages installed in images, as well as producing a bill of materials (BOM) for what each image contains
In this article, we’ll provide a reference pipeline using AWS services that will build a container image directly from application source code without the need for a Dockerfile. This will allow us to examine how to integrate the Cloud Native Buildpacks project with AWS CodePipeline and AWS CodeBuild to create a delivery pipeline that packages container images to then be deployed to container-based services such as Amazon EKS or Amazon ECS.
Cloud Native Buildpacks Concepts
Building container images with Cloud Native Buildpacks is a different experience than using other tools like a Dockerfile. As such, let’s take a look at the CNB ecosystem and some of the core concepts involved.
There are main concepts introduced by the CNB project, which are documented well on the official site. For the purposes of this blog post, there are a few to call out in particular:
- Application image: The OCI-compliant container image is produced as the end product, which can be run in Docker, Kubernetes, Amazon ECS, etc.
- Buildpack: A unit of work that operates on the application source code with the goal of contributing artifacts or configuration to the final run image.
- Builder: An image that packages together one or more buildpacks, base images for both the build stage and final image produced, as well as configuration and other metadata to allow it to be consumed by the CNB tooling. Builders are used to package and distribute the buildpacks created by the community, as well as to provide the capability to organizations to build and package their own set of buildpacks.
- Build image: A base image used to construct the build environment in which the buildpacks will run.
- Run image: A minimal base image used for the final application image.
- Pack CLI: A tool that consumes application source code and a builder to produce the final application image.
Here is how these concepts interact at a high level:

The ecosystem can be broadly split into three parts:
- The Cloud Native Buildpacks project, which is part of the CNCF, includes the Cloud Native Buildpack specification, the pack CLI, and reference implementations of parts of the CNB specification.
- Builders and buildpacks produced and distributed by open-source projects and commercial vendors such as Paketo and Heroku.
- Open-source projects and vendors that integrate with the CNB project to consume builders and buildpacks to provide source-to-container capabilities, such as Heroku, Spring Boot, GitLab Auto DevOps, and HashiCorp Waypoint.
During this blog post, we will interact with the CNB project via the pack CLI, as well as an open-source builder and buildpack implementations from the Paketo project. The CloudFormation template related to this blog post can be found on GitHub.
Solution Overview

The steps in the process are as follows:
- The source code of a sample Java-based Spring Boot application is populated in an AWS CodeCommit repository
- Commits to the repository will trigger CodePipeline to orchestrate the build process
- A CodeBuild project will invoke Cloud Native Buildpacks via the pack CLI to create an container image
- The image is then pushed to an Amazon Elastic Container Registry (Amazon ECR) repository
- A sample subsequent CodeBuild project will be provided that illustrates referencing the image that was created
Prerequisites
The prerequisites for this solution are:
- The correct AWS Identity and Access Management (IAM) role permissions for your account allowing for the creation of the CodePipeline pipeline, CodeBuild projects, Amazon ECR repositories, Amazon Simple Storage Service (Amazon S3) buckets and AWS Lambda functions.
Deploying the pipeline
To deploy the pipeline, complete the following steps:
- Download the CloudFormation template and pipeline code from the GitHub repo.
- Log in to your AWS account if you have not done so already.
- On the CloudFormation console, choose Create Stack.
- Choose the CloudFormation pipeline template.
- Choose Next.
- Enter a name for the stack.
- The default stack parameters can be used, although tweaks are possible:
- Under Builder, specify the CNB builder to be used to build the container image. By default, this will use the Paketo Buildpacks Base builder.
Examining the pipeline
By the time the CloudFormation stack has completed its deployment, the CodePipeline will already be running or perhaps have completed. The CloudFormation template that was deployed includes a custom resource that initializes a new Java-based Spring Boot application using the Spring Initializr and commits it to the CodeCommit repository so we have a working application ready to test with.
There is nothing significant that makes this application compatible with CNB. We are using a Maven-based Java project, but this could alternatively be an NPM-based Node.js application, a Go application, or any other supported platform.
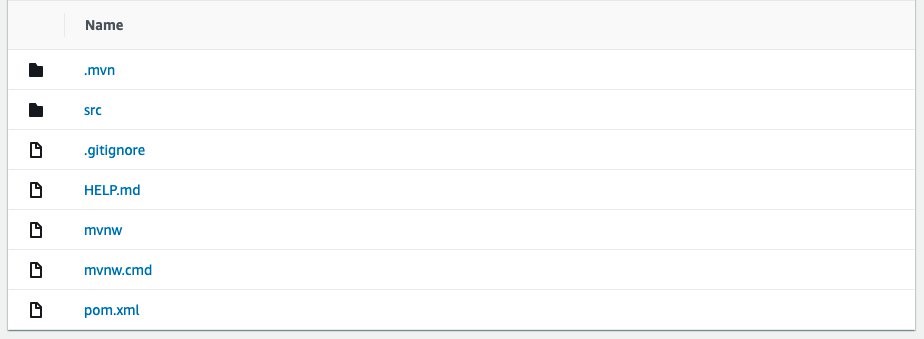
Notice that there is no Dockerfile present in the source code, which we would typically use to containerize the application. Instead, CNB will take responsibility for taking our source code and building an appropriate container image.
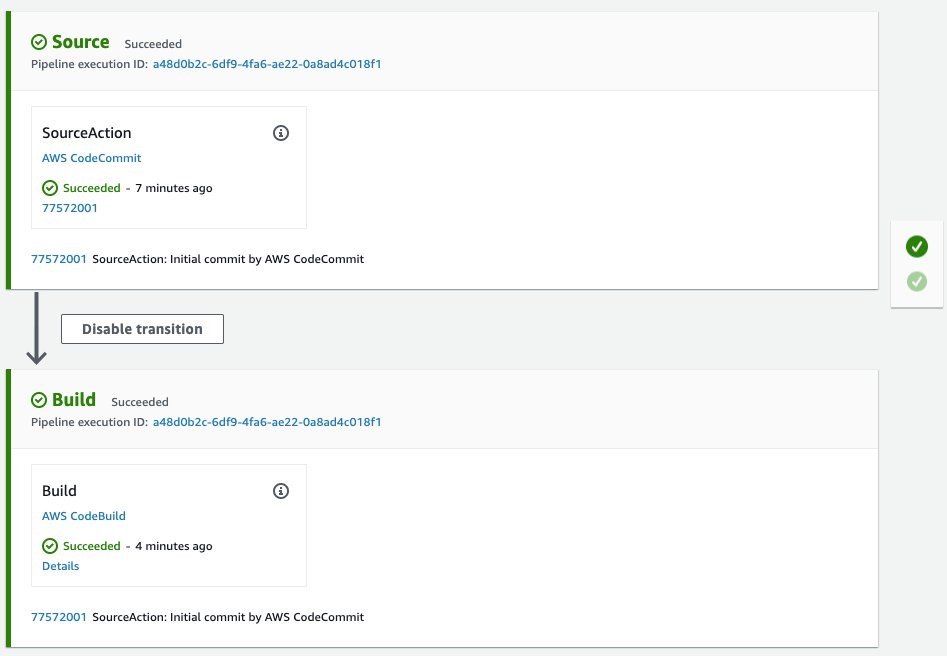
While we wait for the first execution to complete, let’s examine the structure of the CodePipeline:
Once the pipeline completes, an image will have been pushed to the Amazon ECR repository created by the AWS CloudFormation stack:

Additionally, because CNB produces OCI-compliant images, we can still leverage features such as container image scanning provided by Amazon ECR to detect vulnerabilities in the images.
Cloud Native Buildpacks at work
With the build complete, the logs from CodeBuild will illustrate some of the features of CNB at work.
Unlike when using a Dockerfile, CNB just took care of a lot with very little direction. We now have an OCI-compliant container image pushed to Amazon ECR, ready to be deployed, that::
- Includes necessary middleware like the Java Runtime Environment.
- Has specific customizations based on our application framework (Spring Boot).
- Was created in a disposable build container, provided only with the application source code (rather than a distributable package like an executable or JAR file).
- Is secure by default, running as a non-root user and with minimal packages installed.
To get a better idea of how buildpacks produced the container image, let’s break down some of the output log to look at what happened.
===> DETECTING
7 of 18 buildpacks participating
paketo-buildpacks/ca-certificates 2.1.0
paketo-buildpacks/bellsoft-liberica 7.0.0
paketo-buildpacks/maven 4.0.0
paketo-buildpacks/executable-jar 4.0.0
paketo-buildpacks/apache-tomcat 4.3.0
paketo-buildpacks/dist-zip 3.0.0
paketo-buildpacks/spring-boot 4.0.0
The first thing that occurred was the detect phase, which determined which buildpacks from our builder should be run to build the application. The application was correctly identified as a Maven-based Java application. It was even able to perform deeper analysis to understand that we’re using the Spring Boot framework to build the application. This allows buildpacks to further tune the resulting image.
===> BUILDING
Paketo BellSoft Liberica Buildpack 7.0.0
https://github.com/paketo-buildpacks/bellsoft-liberica
Build Configuration:
$BP_JVM_VERSION 11.* the Java version
Launch Configuration:
$BPL_JVM_HEAD_ROOM 0 the headroom in memory calculation
$BPL_JVM_LOADED_CLASS_COUNT 35% of classes the number of loaded classes in memory calculation
$BPL_JVM_THREAD_COUNT 250 the number of threads in memory calculation
$JAVA_TOOL_OPTIONS the JVM launch flags
BellSoft Liberica JDK 11.0.9: Reusing cached layer
BellSoft Liberica JRE 11.0.9: Contributing to layer
Downloading from https://github.com/bell-sw/Liberica/releases/download/11.0.9+11/bellsoft-jre11.0.9+11-linux-amd64.tar.gz
The first buildpack to execute installed a Java Development Kit (JDK) and Java Runtime Environment (JRE), which are needed to build and run the application. In the interest of following Java best practices, the buildpack installs the JDK in the build container such that it is only available while the application is being built and packaged, after which it will be discarded. The JRE is installed in the final image that is produced and will be used at runtime to execute the Java code.
In this case, the Paketo builder used the Bellsoft Liberica distribution by default, but this can be swapped out for alternatives such as AdoptOpenJDK.
Paketo Maven Buildpack 4.0.0
https://github.com/paketo-buildpacks/maven
Build Configuration:
$BP_MAVEN_BUILD_ARGUMENTS -Dmaven.test.skip=true package the arguments to pass to Maven
$BP_MAVEN_BUILT_ARTIFACT target/*.[jw]ar the built application artifact explicitly. Supersedes $BP_MAVEN_BUILT_MODULE
$BP_MAVEN_BUILT_MODULE the module to find application artifact in
Creating cache directory /home/cnb/.m2
Compiled Application: Contributing to layer
Executing mvnw -Dmaven.test.skip=true package
[INFO] Scanning for projects...
[...]
[INFO] ------------------------------------------------------------------------
[INFO] BUILD SUCCESS
[INFO] ------------------------------------------------------------------------
[INFO] Total time: 19.546 s
[INFO] Finished at: 2020-10-30T17:32:45Z
[INFO] ------------------------------------------------------------------------
Removing source code
Now that the JDK has been installed, the Maven buildpack has run and packaged the Java application inside the build container. This is useful because it means that the application can be built consistently, whether locally or in Continuous Integration tools, with few system dependencies necessary to first build the application before creating the container image. A similar process is executed for Node npm/Yarn and Go Modules.
Paketo Executable JAR Buildpack 4.0.0
https://github.com/paketo-buildpacks/executable-jar
Writing env.launch/CLASSPATH.delim
Writing env.launch/CLASSPATH.prepend
Process types:
executable-jar: java org.springframework.boot.loader.JarLauncher
task: java org.springframework.boot.loader.JarLauncher
web: java org.springframework.boot.loader.JarLauncher
Paketo Spring Boot Buildpack 4.0.0
https://github.com/paketo-buildpacks/spring-boot
Launch Helper: Contributing to layer
[...]
Several other buildpacks run after the application is built to perform various tasks. The most important is wiring up an appropriate entrypoint for the container, which is done automatically by the Executable JAR buildpack, since we are using the Spring Boot application framework.
===> EXPORTING
Adding layer 'paketo-buildpacks/bellsoft-liberica:helper'
Adding layer 'paketo-buildpacks/bellsoft-liberica:java-security-properties'
[...]
Adding label 'org.springframework.boot.spring-configuration-metadata.json'
Adding label 'org.springframework.boot.version'
Setting default process type 'web'
*** Images (sha256:a60d8410d71851b99c3b66840a8d8876fe4dca5338e2da680aef8e62324025d2):
785487814634.dkr.ecr.us-west-2.amazonaws.com/buildpacks-blog-imagerepository-urtzbez3ivqi:latest
785487814634.dkr.ecr.us-west-2.amazonaws.com/buildpacks-blog-imagerepository-urtzbez3ivqi:ad96a48
After all of the buildpacks have contributed to the relevant layers, pack assembles the final image and adds various metadata as image labels.
Adding cache layer 'paketo-buildpacks/bellsoft-liberica:jdk'
Adding cache layer 'paketo-buildpacks/maven:application'
Adding cache layer 'paketo-buildpacks/maven:cache'
Successfully built image '785487814634.dkr.ecr.us-west-2.amazonaws.com/buildpacks-blog-imagerepository-urtzbez3ivqi:latest'
Finally, a cache image is produced to speed up subsequent builds. For this particular application, the buildpacks are caching the JDK and Maven dependencies so that they need not be downloaded again unless any changes occur.
CodeBuild project
Let’s take some time to examine the CodeBuild project to understand what is happening. The following is the buildspec.yml that is being specified in CloudFormation:
version: 0.2
env:
  variables:
    builder: "paketobuildpacks/builder:base"
    pack_version: "0.18.1"
    application_name: "default_application"
  exported-variables:
  # Exported the image tag to be used later in the CodePipeline
  - IMAGE_TAG

phases:
  install:
    commands:
    # Download the pack linux binary
    - wget -q https://github.com/buildpacks/pack/releases/download/v$pack_version/pack-v$pack_version-linux.tgz -O - | tar -xz
    - chmod +x ./pack
  pre_build:
    commands:
    # Log in to ECR
    - ECR_DOMAIN="$AWS_ACCOUNT_ID.dkr.ecr.$AWS_DEFAULT_REGION.amazonaws.com"
    - aws ecr get-login-password --region $AWS_DEFAULT_REGION | docker login --username AWS --password-stdin $ECR_DOMAIN
    # Set up some derived values for subsequent phases
    - COMMIT_HASH=$(echo $CODEBUILD_RESOLVED_SOURCE_VERSION | cut -c 1-7)
    - ECR_REPOSITORY="$ECR_DOMAIN/$application_name"
    - IMAGE_TAG="$ECR_REPOSITORY:$COMMIT_HASH"
  build:
    commands:
    - |
      ./pack build --no-color --builder $builder \
      --tag $IMAGE_TAG $ECR_REPOSITORY:latest \
      --cache-image $ECR_REPOSITORY:cache \
      --publish
This CodeBuild project is relatively simple and can be broken down into several tasks:
- Download the pack CLI and make it executable.
- Provide the local Docker daemon with credentials for Amazon ECR so CodeBuild can pull and push images.
- Derive the tag for our container image, which is done by using the first six characters of the Git commit that triggered the build.
- Execute the pack CLI with the appropriate arguments, which instructs it to:
- Use the builder specified when the CloudFormation stack was deployed.
- Tag the image as both latest and using the derived tag from (3).
- Produce a cache image that can be used to cache artifacts such as our Maven .m2 directory.
- Automatically push the image to Amazon ECR when the build completes
The project is also configured to export the IMAGE_TAG environment variable, which allows CodePipeline to reference it and make it available to downstream actions in the pipeline, for example to trigger a deployment to Amazon ECS or Amazon EKS.
Making a change
To explore how the buildpack process behaves when we make a code change to an application, let’s modify the application source code and push the changes to CodeCommit to trigger a new build. If you wish, you can do this by cloning the CodeCommit repository and making the changes on your local machine. However, for simplicity, we’ll demonstrate doing this directly through the console.
Navigate to the CodeCommit repository that was created by the CloudFormation stack and select Add file, then Create file.

This will provide us with a user interface that we can use to add a new file and commit it to the repository. Let’s add an index.html page that can be served by Spring Boot:

Once the change is committed, CodePipeline will initiate a new execution. Let’s compare these:

Even though we changed our application code, the build was almost 50 percent quicker. This is due to two aspects of buildpacks:
- The pack CLI will first pull our previous image tagged
latestbefore it runs the new build to reuse as many layers as possible. This is why tagging the image with bothlatestand the Git commit is valuable. - Because we configured a cache image in our buildspec, we are able to cache dependencies such as our Maven packages across builds, even in an ephemeral CI/CD system like CodeBuild.
Next, let’s compare the layers of the images from the two different builds:
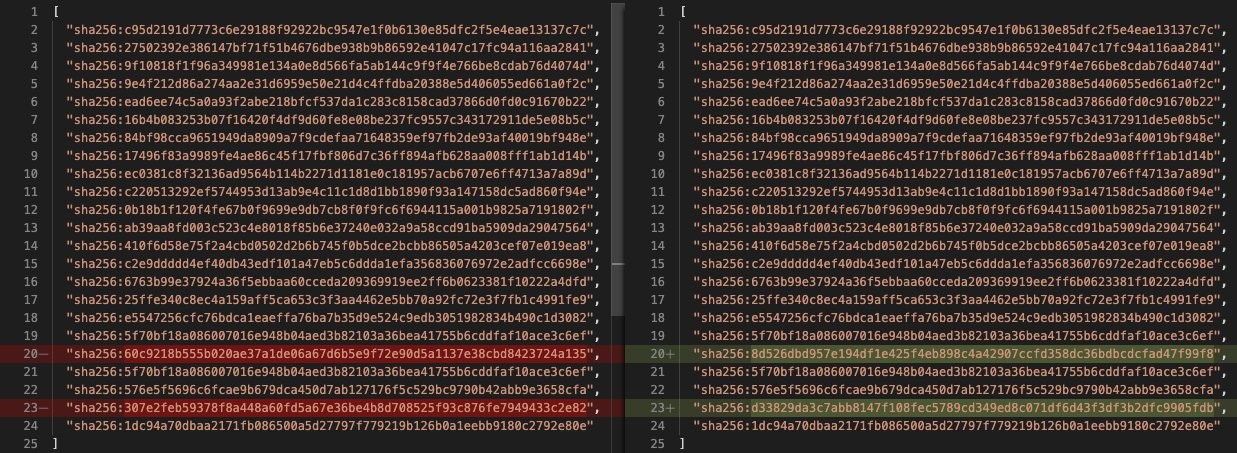
Interestingly, two layers of the later layers in our image have been altered, but some subsequent layers are unchanged. How could this happen? With a Dockerfile, when you change a layer, every subsequent layer has to be rebuilt, pushed, and pulled. This illustrates another great benefit of CNB, which is that due to the way that layers are constructed, pack can update an intermediate layer of the image and push just that change, rather than a cascading set of layer changes. This makes build times, as well as pushing and pulling the image to and from container repositories like Amazon ECR, a lot more efficient.
Cleaning up
To avoid incurring future charges, clean up the resources created as part of this post.
- On the S3 console, open the bucket from the stack Outputs tab named
PipelineS3Bucket - Select all objects in the bucket and choose Delete
- When prompted, enter
permanently deleteand choose Delete - On the Amazon ECR console, open the repository from the stack Outputs tab named
EcrRepository - Select all tags in the repository and choose Delete
- When prompted, enter
deleteand choose Delete
Once this has been completed, open the CloudFormation console and delete the stack to remove the remaining resources.
Conclusion
In this post, we explored:
- The basics of Cloud Native Buildpacks.
- How to use them to create a container image with AWS CodeBuild.
- Orchestrating the process with AWS CodePipeline in order to further use the container image for deployment.
This blog has only scratched the surface of the benefits of buildpacks and how they work, as well as integrating the project with other AWS services such as CodePipeline and CodeBuild.
To learn more about buildpacks, you can visit buildpacks.io and watch this session from the recent virtual KubeCon event.