AWS Compute Blog
Unify your iOS mobile app CI/CD pipeline with Amazon EC2 Mac Instances
This post is written by Benjamin Meyer, Solutions Architect at AWS
With Amazon EC2 Mac instances, AWS customers can run macOS workloads on AWS and benefit from the scale, elasticity, reliability, and experience of AWS. With EC2 Mac instances, it’s possible to bootstrap macOS machines in the cloud and use these for building, testing, and deploying iOS applications in the cloud with the security, scalability, and flexibility of the cloud. Today, millions of developers rely on Apple’s industry-leading platforms and tools such as Xcode and Swift, and powerful frameworks like Core ML and Metal, to create apps for over a billion customers globally. Previously, customers did not have access to On-Demand Instance macOS environments in the cloud.
A common CI/CD automation tool for developers is Jenkins. Jenkins offers the ability to use build agents, to distribute CI/CD pipelines across machines or schedule parts of a pipeline to a specific instance type or container. In this blog, you learn how to add an Amazon EC2 Mac instance as a build agent to an existing Jenkins server. Additionally, the blog illustrates how to use Fastlane with a declarative Jenkins pipeline on the macOS build agent to build and test your iOS and macOS applications. While this blog post shows how to use an Amazon EC2 Mac instance with Jenkins, it can be done with different CI/CD applications such as GitLab runners.
With over 3.5 billion smartphone users worldwide and a constant growth in new smartphone users, there is an increasing demand for mobile applications. This growth is reflected by the number of available apps in the Apple App Store. With this increasing demand for mobile applications, companies investing more heavily into mobile application development to drive user engagement. This blog post helps mobile app developers create using CI/CD pipelines with Amazon EC2 Mac instances.
Overview
The following diagram gives an overview of the architecture this blog post builds up.

A prerequisite for this walkthrough is that you have an existing Jenkins set up within a Amazon Virtual Private Cloud (VPC) to build projects. If you want to follow along and don’t have Jenkins, you can do the Jenkins on AWS tutorial from the jenkins documentation.
The following steps review what is covered in the blog post:
- Set up of the Amazon EC2 Mac Instance to build iOS and macOS projects by using the open source tool Fastlane.
- Add the EC2 Mac Instance as build agent to an existing Jenkins.
- Run a Fastlane example pipeline for an iOS project using the Mac build agent.
Now that you understand the steps covered in this blog post, let’s get started.
Setup of the Amazon EC2 Mac Instance to build iOS Applications
Amazon EC2 Mac Instances must run on a Dedicated Host. To allocate a Dedicated Host, open the AWS Management Console and follow the steps I outline:
1. Ensure you are in a Region where the Amazon EC2 Mac instance is available
- Navigate to the EC2 Dashboard
- In the navigation, choose Dedicated Hosts and choose Allocate Dedicated Host
- For Name tag, enter mac1-instance
- For Instance family, select mac1
- For Availability Zone, select <region>a
- Choose Allocate
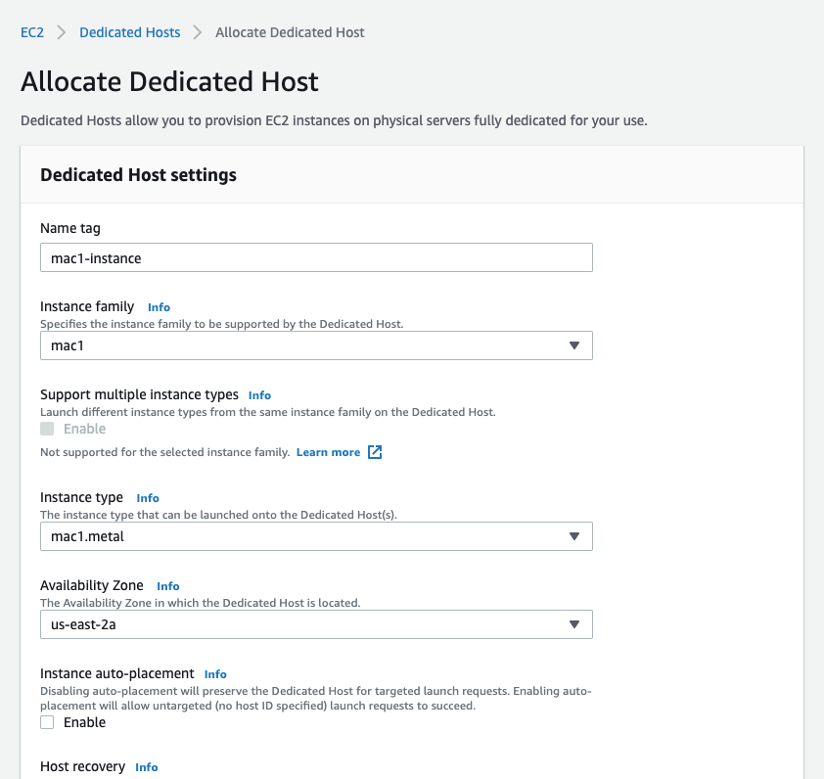
This allocates a Dedicated Host where the Amazon EC2 Mac instance is scheduled on.
2. Start the Amazon EC2 Mac Instance
- Navigate to the EC2 Dashboard
- In the navigation, choose Instances and choose Launch Instance
Step 1
- Select the latest macOS Big Sur version
Step 2
- Choose mac1.metal as Type
Step 3
- For Network, select the VPC of your Jenkins head node
- For Subnet, select the subnet of your provisioned Dedicated Host
- For Host, select the previously allocated Dedicated Host
- In the Advanced Details, add the following script to the User Data
Step 4
- Increase the EBS size to 256GiB and skip ahead to Step 6
Step 5
- Select the security group of your Jenkins server or create a new Security Group. It is important, that the Jenkins head node and the Mac1 instance can communicate network wise.
Step 6
- Choose Review and Launch and choose Launch
- In the Select an existing key pair or create a new key pair dialog box, choose an existing key pair or create a new one. This key pair is important to connect the Jenkins leader node later and for installing Xcode with a VNC client.
When the mac1 instance boots up the first time, the ec2-macos-init tool runs the script you added to the user data. In the user data, Openjdk 8 for the Jenkins agent is installed and a Jenkins user is created. To allow the Jenkins leader node to access the agent as Jenkins user through SSH, the script adds the same SSH key from the ec2-user to the jenkins user. This is important so that the user that runs the Jenkins pipelines can’t delete system relevant files. Lastly, it resizes the boot volume to the Amazon EBS size and starts the ARDAgent. This allows you to connect with a VNC Client to the instance. For more information on the volume resizing, the ARDAgent, or the ec2-macos-init, see Amazon EC2 Mac instance.
Before explaining how to add this instance as a build agent, Xcode must be installed on the instance. As the installation requires logging in to the Apple AppStore, follow the instructions of Connect to your instance using Apple Remote Desktop. Then download and install Xcode manually using the User Interface. Make sure to open Xcode once to accept the Xcode and iOS SDK License Agreement.

At the end of this section, you should have an Amazon EC2 Mac Instance which is set up to build iOS projects. Now, you can add this instance as a build agent to your Jenkins.
Add the Amazon EC2 Mac Instance as Build Agent
With the previous setup of the EC2 Mac Instance, you can add the EC2 Mac Instance as Jenkins agent through SSH. You can do this by following these steps (each group of instructions is followed by a corresponding screenshot of the completed steps):
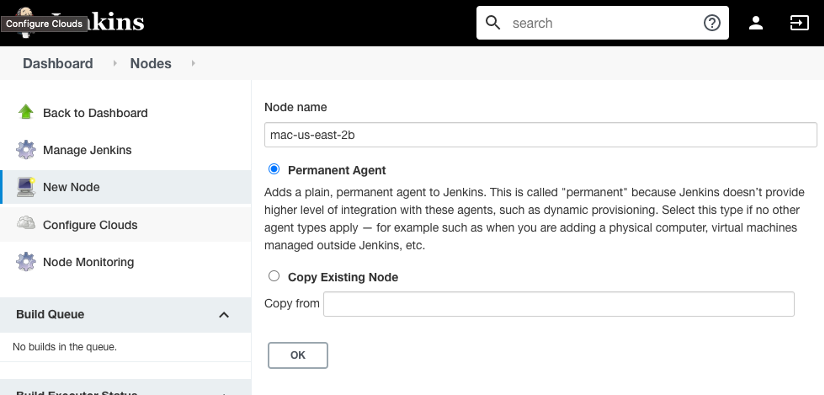
- On the Jenkins start page, choose Set up an agent. If you use an existing Jenkins navigate to Manage Jenkins > Manage Nodes and Clouds > New Node
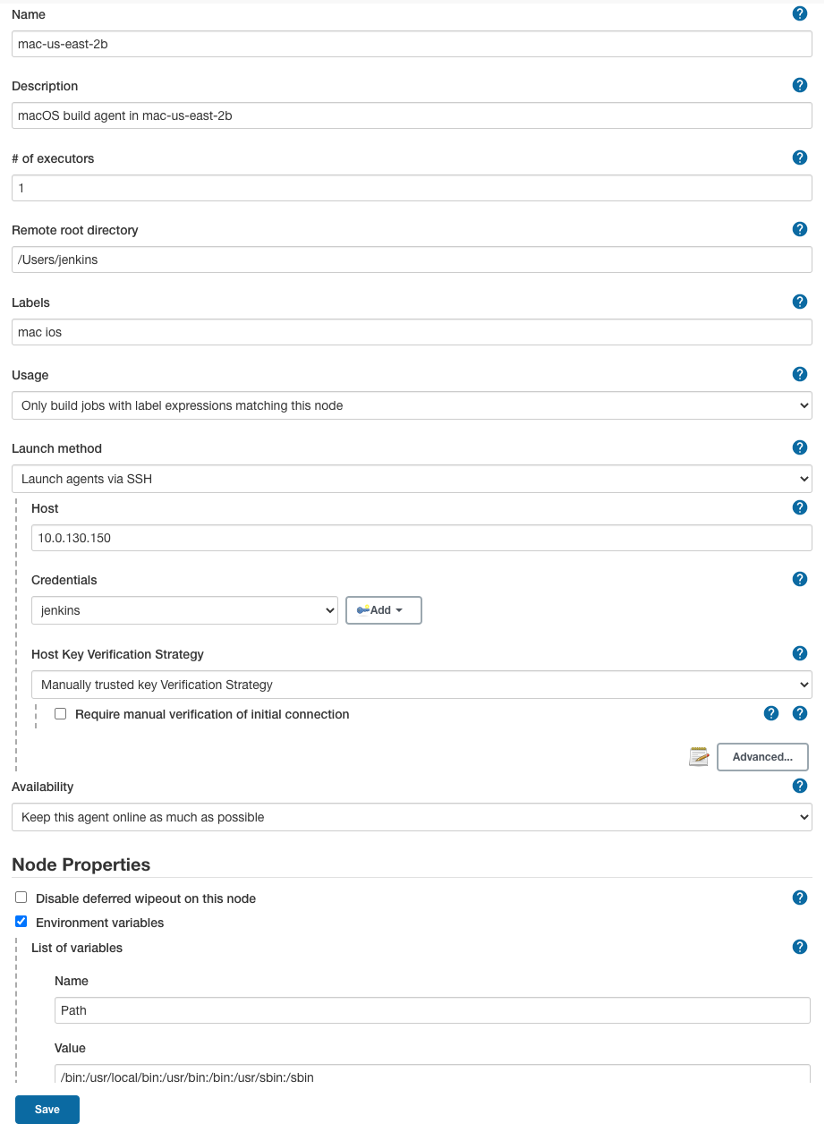
- For Node name, enter mac-<region><az> and choose Ok
- For Description, enter macOS build agent in <region><az>
- For Remote Root Directory, enter /Users/Jenkins
- For Labels, add ios mac
- For Usage, select Only build jobs with label expressions match this node
- For Launch method, select Launch agents via SSH
- For Host, add the IP Address of your mac instance
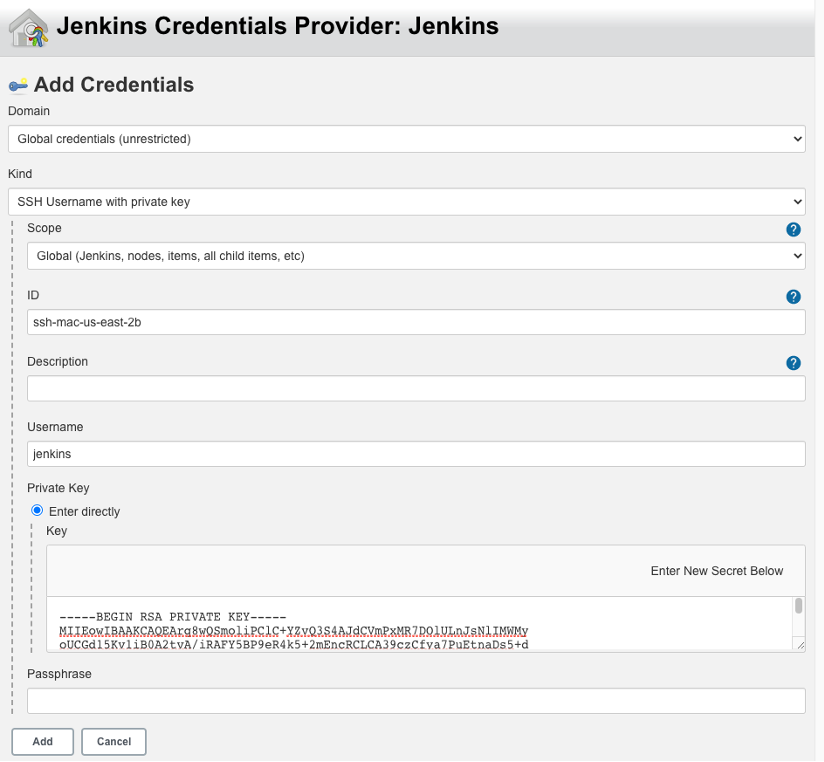
- Choose add right of Credentials and select SSH Username with private key for Kind
- For ID, enter ssh-mac-<region><az>
- For Username, enter jenkins
- For Private Key, select Enter directly and add the private key as text
- Choose Add
- Back at the agent configuration, for Host key verification strategy, select Manually
trusted key Verification Strategy - At the Node Properties, select Environment Variables and choose Add
- For Name, enter Path and for Value enter
/bin:/usr/local/bin:/usr/bin:/bin:/usr/sbin:/sbin
- Choose Save
After this, the Jenkins leader node SSH to the agent and verifies that a compatible java runtime is installed. If everything is fine, it installs the agent jar and starts it on the build agent and the agent is shown healthy in the Jenkins UI. These steps can be verified by opening the agent and looking into the logs of it. Right after saving:
- Choose the node with the name mac-<region><az>
- In the Menu, choose Log

How to run a Fastlane pipeline on the macOS Build Agent
Fastlane is an open-source platform aimed at simplifying Android and iOS deployment. Fastlane is written in Ruby and provides fastlane actions to automate every aspect of the development and release workflow of mobile applications.
To finally build the first iOS application on the macOS agent, open the Jenkins UI and log in:
- From the Menu, choose New Item
- For Enter an item name, enter HelloWorld
- Choose Pipeline and choose Ok
- For Definition in the Pipeline section, select Pipeline script from SCM
- For SCM, select Git
- For Repository URL, enter https://github.com/aws-samples/amazon-ec2-mac-instance-jenkins-agent.git
- For Branch Specifier (blank for ‘any’), enter */main
- For Script Path, enter HelloWorld/Jenkinsfile
- Choose Save

- From the Menu, choose Build Now
Now that the Jenkins job is set up and ran the first time, let’s take a look at what happens. Inside of the HelloWorld folder is a Jenkinsfile with a declarative Jenkins pipeline. This pipeline has two stages. In the first stage it uses bundler to install Fastlane into the local folder and in the second stage it runs all tests of the project using a Fastlane lane. The definition of the run lane is found in the Fastlane folder inside of the HelloWorld project and looks like this:

The same mechanism can be used to execute any other lane, for example, to deploy the app to TestFlight right from that EC2 Mac Instance using Fastlanes testflight action.
Clean Up
If you are finished experimenting with your Mac instance, you can release the Dedicated Host. Before you can release the Dedicated Host, you must stop or terminate the Mac instance. You cannot release the host until the allocation period exceeds the 24-hour minimum. Follow these steps in the AWS Management Console to avoid incurring unwanted cost.
- Navigate to the EC2 Dashboard
- In the navigation, choose Instances and select the previously created Amazon EC2 Mac Instance
- From Instance state, choose Terminate Instance
- In the navigation, choose Dedicated Hosts and select the previously created Dedicated Host
- From Actions, choose Release host
Conclusion
In this blog, you learned how to bootstrap an Amazon EC2 Mac Instance with the required tools to have a Jenkins leader node start a build agent on it. I also covered how to manually add this instance to an existing Jenkins and run tests of an iOS demo application using Jenkins declarative pipelines and Fastlane.
If you want to dive deeper on how to build, test, and distribute mobile iOS applications, we recommend you read through the documentation of Fastlane on iOS Beta deployment using Fastlane and especially read the A new approach to code signing from Fastlane to simplify the codesigning before deploying an application to the AppStore.
To get started using Amazon EC2 Mac Instances, click here. For more information on the configuration and deployment of Amazon EC2 Mac Instances, see Amazon EC2 Mac instances of the Amazon Elastic Compute Cloud Documentation.
Building an Amazon Machine Image the first time you set up an EC2 Mac Jenkins agent allows simple and seamless deployment of many more build agents using the same image. To read more about this, see Amazon Machine Images (AMI) of the Amazon Elastic Compute Cloud Documentation.