AWS Compute Blog
Setting up AWS Lambda with an Apache Kafka cluster within a VPC
This post was written by Mandakini Saroop, Senior Product Manager, and Peiyu Wu, Software Development Engineer.
Amazon Managed Streaming for Apache Kafka (Amazon MSK) is a fully managed, highly available service that uses Apache Kafka to process real-time streaming data. Apache Kafka is an open source event streaming platform used to support workloads such as data pipelines and streaming analytics.
A previous blog post shows how to use an AWS Lambda function as a consumer for Amazon MSK or Apache Kafka clusters. This post shares additional tips to set up functions and consuming events from a cluster.
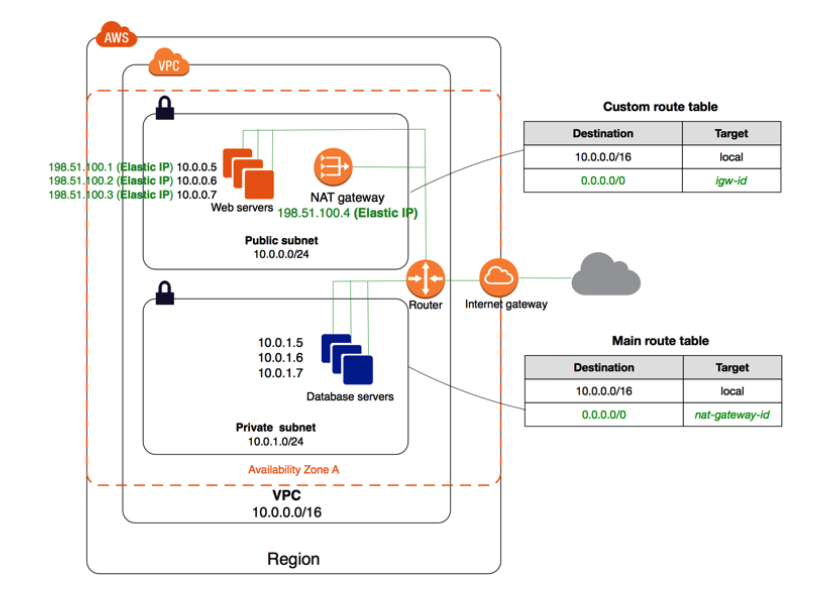
You can connect a cluster within a virtual private cloud (VPC) to a Lambda function by configuring a NAT Gateway or PrivateLink in the public subnet of each Region. We recommend operating your Kafka cluster across multiple Availability Zones for availability and fault tolerance. Before you get started, ensure that your VPC is set up to access the following resources: Lambda, AWS Security Token Service (STS), and optionally AWS Secrets Manager (for authenticated clusters).
Setting up the VPC
First, create a VPC with three subnets across three Availability Zones. A subnet with a route table that has a route to an internet gateway is a public subnet. An internet gateway is a horizontally scaled, redundant, and highly available VPC component that allows communication between your VPC and the internet.

Kafka cluster in a public subnet
To create a Kafka cluster in a public subnet:
- Create a VPC by choosing Launch VPC Wizard from the VPC console.

- Select “VPC with a single public subnet”.

- Add two more public subnets in different Availability Zones than the subnet you just created.

- Edit the route table association. In the route table ID list, choose the same route table as the first subnet.


You have now set up a VPC with three public subnets. Any resources within this VPC, such as the Kafka cluster, have access to Lambda, STS, and Secrets Manager.
Kafka cluster in a private subnet
Resources within a private subnet have no internet connectivity, unless set up with either a NAT Gateway or a VPC endpoint powered by AWS PrivateLink.
Setting up a NAT Gateway
Some things to know before setting up the NAT Gateway:
- NAT Gateways should reside in a public subnet.
- An Elastic IP address is required for your NAT Gateway.
- After creation, you must update the route table associated with the private subnet to point internet-bound traffic to the NAT Gateway.
- Resources using multiple Availability Zones should use the NAT Gateway provided in the same Availability Zone. For a setup with three Availability Zones, you need three public subnets, three private subnets, and three NAT Gateways.
To set up the NAT Gateway:
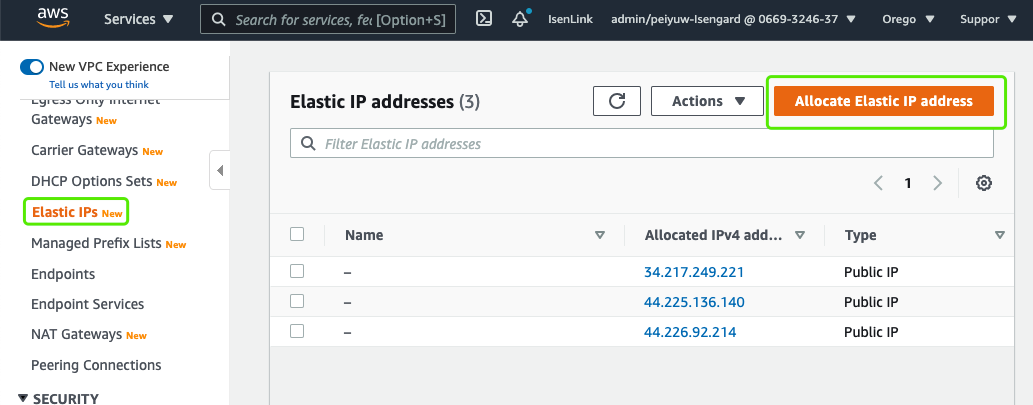
- In the navigation pane of the VPC console, choose Elastic IPs, then “Allocate Elastic IP address”. Choose Amazon’s pool of IP addresses for the public IPv4 address pool, and choose Allocate. Record this IP address, as it is used in the next step.

- Create the VPC by choosing Launch VPC Wizard from the VPC dashboard in the AWS Management Console, and choosing “VPC with public and private subnet”.

- Choose the same Availability Zone for both subnets, and use the Elastic IP address you created in the first step. You use this to create the NAT Gateway.

- Create two more sets of public and private subnets in each of the Availability Zone. Ensure that the public subnets are associated with the same route table created in the beginning, and then create NAT Gateways for each set of subnets.

- As a final step, create two more route tables, and route 0.0.0.0/0 to the NAT Gateways, and associate these with the private subnets.

With this, you have successfully created a VPC with three public subnets, three private subnets, and three NAT Gateways in three different Availability Zones.

Any resource you create within the private subnets have internet access to Lambda, STS and Secrets Manager, the resources needed for the function.

Setting up VPC endpoints with PrivateLink
You can also use VPC endpoints using AWS PrivateLink for resources in a private subnet. To set this up:
- Create a VPC by choosing Launch VPC Wizard from the VPC dashboard, and choosing “VPC with a single public subnet”. Create three such subnets in the VPC. Make sure they are private by ensuring that they are not routing traffic to internet gateway.

- Create the interface endpoints. Open the endpoints page of the Amazon VPC console, and choose Create Endpoint. Choose “AWS services” as the category, “com.amazonaws.us-west-2.lambda” as the service name, and “Interface” for type. Next, choose VPC and select the three subnets you created in the previous step, and select or create a security group. Keep the other options as default options, and choose Create Endpoint. Repeat these steps for “com.amazonaws.us-west-2.sts” and “com.amazonaws.us-west-2.secretsmanager”.


With this, you created a VPC with one public subnet and three private subnets. For each private subnet, you created an interface endpoint for Lambda, STS, and Secrets Manager.
Creating the Kafka cluster
You can now start creating the event source. In this example, create an Amazon MSK cluster for a VPC set up with a NAT Gateway, in addition to a VPC set up with endpoints using PrivateLink.
- Go to the Amazon MSK console, and choose Create Cluster.
- Choose Create cluster with custom settings and make sure that the VPC that you provide is the one you set up earlier.
- Select SASL/SCRAM for AuthN so you can test the connection to Secrets Manager.
- Create one cluster each for the VPC with NAT Gateway and the VPC with endpoints powered by PrivateLink, and associate the SASL/SCRAM secret for each cluster. You can refer to the Amazon MSK User Guide to set up your Kafka cluster.
Creating the Lambda function
Once the cluster is created, you can use it to invoke a Lambda function:
- Create a Lambda function. If you don’t have one already, you can use the following sample Python function:
import boto3 import time import os import json import sys import base64 from datetime import datetime def lambda_handler(event, context): event_received_at = datetime.utcnow() print('Event received at: {}'.format(event_received_at)) print('Received event:' + json.dumps(event, indent=2)) print("success") return - Once the function is created, add Amazon MSK as the trigger. You can use this blog post as a reference for this step.

Testing the function
Now that the function is set up, you can test it end-to-end:
- Start an instance in each VPC to use as a message producer. Configure a Kafka producer, and send a test message.

- Your Lambda function should be able to receive this message, which you can check in the function log.
- With NAT Gateway:

- With VPC endpoints (PrivateLink):
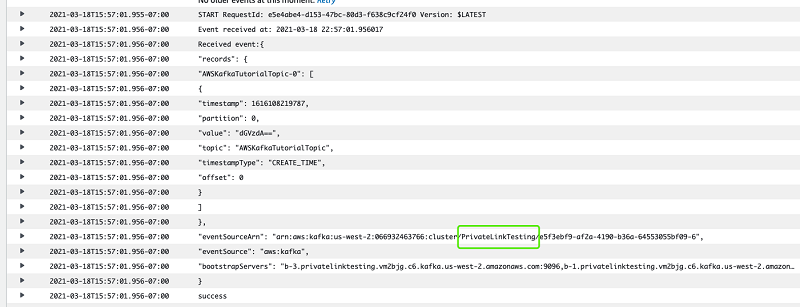
- With NAT Gateway:

AWS CloudFormation templates
You can also use AWS CloudFormation templates to set up a VPC with NAT Gateway and VPC endpoints using PrivateLink. You can find these templates here:
Conclusion
Amazon MSK provide a fully managed, highly available service that uses Kafka to process real-time streaming data. Lambda provides an easier way to build a consumer application for messages in Kafka topics.
Using resources such as NAT Gateways and VPC endpoints with PrivateLink, you can ensure that your data remains secure while also granting access to resources such as Lambda to help you create a Kafka consumer application. This post provides some tips to help you set up a Lambda function using Kafka as a trigger. It also explains various options available to send data securely.
For more serverless learning resources, visit Serverless Land.